I don’t claim to be a good sewist but I’ve got quite enthusiastic about it in the last couple of years. I’ve been sewing my own badges on my camp blanket for years and I’ve made a few drawstring bags but between 2020 and 2022, I’ve started going a bit more experimental and a bit more ambitious and I’d like to show you some of the things I’ve sewed for travel and adventure lately.
We’ll skip over the drawstring bags – suffice it to say, I made my plate bag years ago, my washing-up bag (ok, that one was a lot more complex) right back in 2019 and I have drawstring bags for my camp kitchen bag, my tent repair bag and my general purpose camping-stuff bag. I also made a smaller taller one for storing metal straws and a smaller squarer one for carrying around things like my spare camera battery, phone remote, portable charger etc. But they’re all the same simple pattern.
I hand-sew, by the way. I possess a baby sewing machine but we don’t get on and by the time I’ve unpicked it and yelled at it as many times as necessary, it’s far quicker and less stressful to just get out a needle and thread. Many of these things could have been made in a fraction of the time but for most of them, figuring out what I was doing in the first place took as long as the physical sewing.
Snack pack
This is pretty much the first thing I ever made and there are definitely things I’d do differently now. First, I wish it had a waterproof lining, so I’ve just this minute taken a bit of my orange nylon and made a really simplified version of the snack pack to pop inside. Then I can take it out and wash it. You see, the snack pack itself is red fabric with white dinosaurs and in the spirit of red fabric, it runs and turns the dinosaurs pink when I wash it.
Second, I hated sewing the velcro – I still hate sewing velcro – so I basically just tacked it into place. It was messy but functional and I’ve got so tired of looking at it that I’ve just got the red thread out again and gone through and filled in the gap. It’s very wonky in places but at least a wonky continuous line looks less terrible than a wonky running stitch.
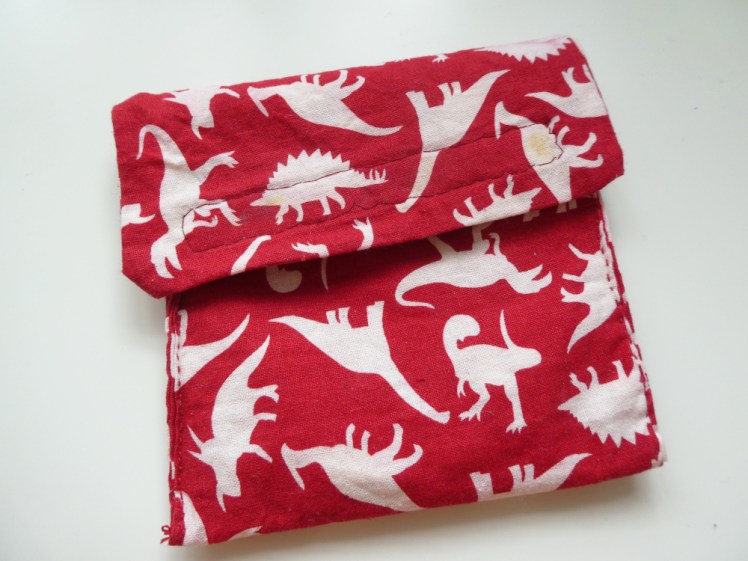
But other than that, I’m quite pleased with it. It’s just two long rectangles sewn back to back and then the bottom folded and sewn to make a pocket and the top folded down to make a flap and now it has a bright orange inner. When I go out walking, I can fill it with snacks and pop it either in my pocket or in my lunch and not mess around with ziplock plastic bags.

I did also make a sandwich wrap but it’s not worked well. It’s never felt as well-waxed as the one I bought and it’s gone kind of crusty and no matter how many times I scrub it (in cold water) it feels like it’s caked in cheese, so sandwich wraps are definitely something to buy rather than make for me.
Masks
Do I need to mention masks? I got quite into making them, so much so that they’ve got a post of their own. Suffice it to say I now own at least seventeen. Five of them have dinosaur patterns. Two are Christmas patterns (gold snowflakes on bright red backed with dancing Santas; gold Christmas trees on deep red backed with red and blue trees), one is Halloween (pumpkins one side, black cats on a green background the other) and the rest are fun fabrics like robots, sea creatures, monsters and rainbow unicorns.

I just love making masks! They’re fairly quick and easy and I get to show off my fun maps when I go out! But as we wear masks more and more rarely, it’s starting to feel like a waste of amazing dinosaur fabric to make another mask with it. And yet what else can I make so easily as a fun fashion accessory? The only thing I can think of is a small bag and I can’t wear as many small bags as I can wear masks.
Jewellery roll
I wanted some way to keep my jewellery safe when I’m travelling and eventually I found a template I liked. Quite frankly, I’ve pretty much copied it, right down to the colours, although that was an accident – that was just what I had in my fabric box that was either in small pieces (not going to cut up a whole new fat quarter to make a tiny pocket!) or that I wasn’t going to use for anything else. My necklace holders are the outer rings of Dorset buttons; I’m not messing around with poppers. I’m just going to clip my necklaces straight onto the rings. My pocket has a zip and I sewed in a tiny piece of cross stitch fabric for securing earrings. The ribbon to fasten the whole thing came from a bundle of fat quarters. It took forever – I had to sew the back and inner together and then I had to turn it inside out and top-sew it all. I rarely bother with that and this was a big long edge to have to do it with.

It’s handy for safely transporting my jewellery and also for storing it when I take it off, namely overnight. No risk of knocking a necklace down the back of a chest of drawers if it’s safely fastened into its ring or losing an earring that’s clipped into a mesh.

Mittens & hat
I like mittens and the only ones I owned were mountain mittens, which had fingers on the inside. I had a gorgeous pair of orange technostretch ones from Cintamani but they got lost several years ago and I still mourn them. So I decided to make myself some mittens. I ordered some fleece, I found a pattern that looked doable and I made a pair of mittens! They’re quite easy – three pieces per mitten, sew two of them together across the middle to make the palm, sew the palm to the back and you’ve got a whole mitten already. Strictly I should have made two pairs and sewn them inside each other as a lining but I’ve never bothered. At this point, I need to finish off the cuffs because the liners are what would have finished them neatly. But I’ve still worn them a lot and I think they’re great!
It turns out a metre of fleece is actually quite a lot so I made a matching hat. I found another easy-looking pattern. Not only that, they had options for adding fun stuff, like Viking horns or cat ears. I added a pair of bear ears with a scrap of pink cotton for the inside. They’re close enough to cow ears without being too ridiculous. Ok, they’re quite ridiculous, but I love them. This post has been really good for getting me to finish things that have been sitting at 98% finished – I’d spent about six solid hours hand-sewing the weekend I made this hat and so when I did the brim, I just did a hasty running stitch and said I’d do the in-filling later. When did I make this? January? And now it’s July 1st and I’ve just gone and finished that seam.

Anyway, this is the first practical wearable reasonably well-finished thing I’ve ever made – a matching set of mittens and hat!
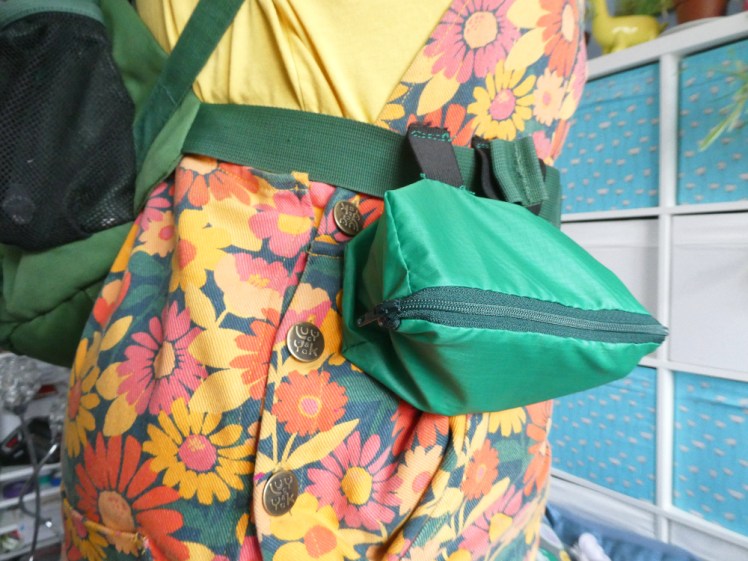
Hiking bag hip pockets
When I go to Dartmoor, all the other ladies have pockets on the belts of their day bags. I don’t have those. I’m quite happy with my bag so I didn’t want to go so far as to buy a new bag to get pockets. After literally years of thinking about it, I ordered a sheet of cordura and with no pattern at all and no clue, I set out to make my own.
In the end, I just made a rectangular box like I did with cardboard boxes at school, only without the tabs. I left one edge open so I could sew a zip in, put two elastic loops on the back so it could be slipped over my belt and ta-dah! Hip belt pocket! Then I made a second, a little better – the elastic loops weren’t so tight the pocket almost broke attaching it to the belt, the seam allowances were a little bigger (it turns out cordura is kind of plastic coated and if you use a huge needle one millimetre from the edge, the plastic just snaps and your seams open themselves up from the inside) and the zip… well, I’m still a beginner at zips. They’re both a bit wonky but at least on my first one, I managed to get the ends hidden inside the pocket. I was so pleased with my nice tidy zips on the second, only to turn it in the right way and discover I’d sewn the loose ends firmly outwards. Ah well.

The next thing was that they looked a bit weirdly blank. We’re so accustomed to logos on things that without one, they looked wrong. So I went to Hobbycraft, bought some tiny bee patches and painstakingly sewed one onto each pocket.
(And it turns out I made an entire post about them!)
I was so proud of them! Then I began using them in earnest and… they fell apart. The plasticky inner peeled off but then the woven outer began to fray and they just came to pieces. So I ordered a piece of green nylon and remade them. They don’t hold their shape quite as well but they’ve been on two walks so far and are still intact. I say “they”. I’ve only made one from nylon so far. It’s looking promising. I’m going to do a little research on pockets and make some more in different shapes. I have so much green nylon and I can afford to make lots of experiments with it.
Backpack strap pocket
I should have been satisfied with my pockets but I still had some scraps of cordura and I saw Seanna running with a water bottle pocket on the front of her hydration pack and I began to covet again. Not for water bottle pockets but for pockets on the front straps. I decided to use my scraps to make a little pocket for my compass, with a stretchy pocket on the front. I’d ordered some nylon samples and when they arrived they were tiny lycra scraps in a fabric similar to my old ballet leotard. No use for making pockets in themselves but they could be a little stretchy front pocket, right?
So front and back were two rectangles with a rounded top and I inserted side panels to give it enough depth to fit the compass. Getting everything in the right place so they weren’t inside out when it was turned right way in was tricky, since I was working with about four layers by the end but it worked. I even sewed a d-ring inside so I could clip the compass’s cord around it. I should have made the pouch half an inch bigger on each side but otherwise, it’s pretty good. I added a bee to this one too. The only thing I’d change is that I’d put an elastic top layer on the stretchy front pocket – sorry, amateur sewist, don’t know the word, but there’s always an elastic thing across the top of your mesh pockets.
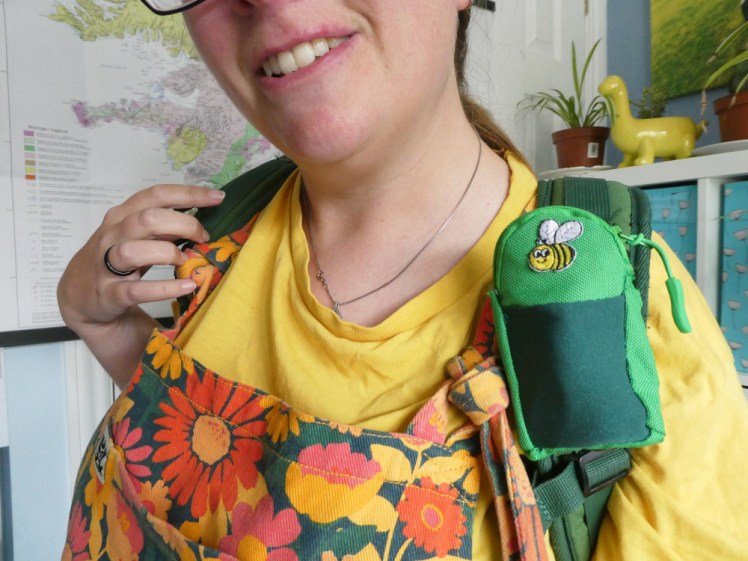
The straps were a pain – I cut cordura straps to wrap it around my backpack but I planned to have them fasten with poppers. Nope. Cordura is far too delicate and the first time I popped them apart, they just tore straight out. I stitched scraps of velcro on and that holds but it’s not pretty.
Jewellery pouch
This one came about because I was going to Iceland. The jewellery roll is a bit big for taking out and about but I knew that when I was going to the pool or in particular to the Blue Lagoon, I was going to want to take my jewellery off. So I sewed a little round pouch– with a zip in it – to keep stuff safe. It’s not quite as round as it should be because my seam allowances are so narrow that it broke in a couple of places and the repairs distorted my edges a bit. But I’m still pleased with it. First that it’s lined really nicely and has a hanging loop and a zip and everything ended up the right way round and second… well, it’s just cute. I love the pop of the red lining and I love how well the zip fits. I’ve had some practice by now, you see.

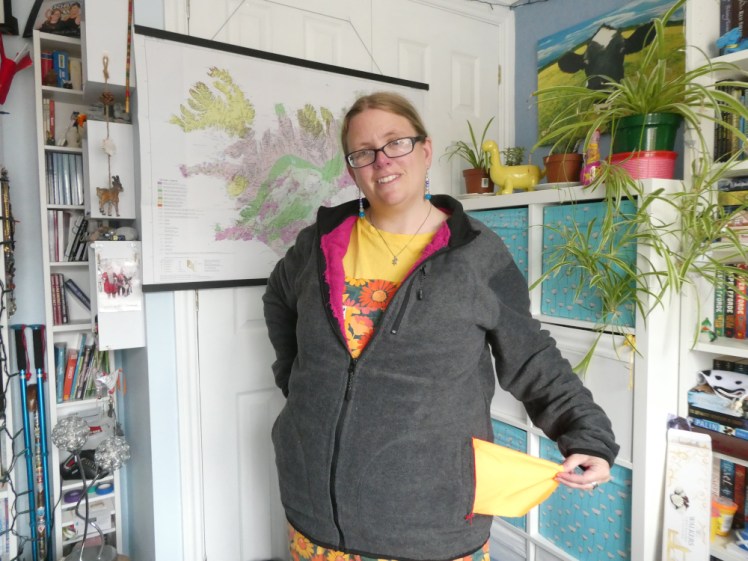
Lightweight washbag
I already have a very satisfactory washbag but it’s quite bulky and sometimes I want something really lightweight with only the absolute essentials. I could easily buy a small pouch but I’d got into the habit of sewing my own by now so I ordered some ripstop nylon. In bright orange. Really bright orange. It burns my eyes to sew. You’ve already seen it because I used it to make the lining to my snack pack. The lightweight washbag just needed to be big enough for toothpaste, toothbrush, deodorant and a scrap of hotel soap in a plastic sandwich bag. That’s all I really need for a lightweight weekend.
The “pattern” is the old primary school Pepsi can pencil case. I didn’t actually use a pattern but that’s what I was picturing as I was figuring out how to make it. It’s a tube with a circular top and bottom and a zip near the top. For someone who’d never touched a zip until six months ago, I’m starting to get quite comfortable with the things. This is the first time I’ve done a nice neat top-stitch along each side of the zip.

Changing robe
This is something I made back in about 2019. It’s two towels sewn together at the top with a gap in the middle for my head and then sewn together at the sides just enough to keep them from flapping while leaving enough flexibility for me to be able to change inside it. In 2022, it had a bit of an update. I’d put it in the washing machine and half the stitches tore so I left it hanging in the bathroom for a really long time.
Then summer came around and I started to wild swim so I realised it was time to get it back together. I measured it against myself and chopped several inches off the top because it was far too long and I sewed it back together again with polyester upholstery thread, which is already stronger than the ordinary cotton I used last time, and I doubled it over for extra strength and when I’d finished sewing, I re-did those seams in blanket stitch as well, just to reinforce them a bit. This time, I’m going to accept that it’s for use on the beach or the poolside and its trips through the washing machine will be minimal.

After-swim jacket
When I went out with the Bluetits that time, one of them said she wished there was a towel-lined fleece you could throw on after a sea swim. I’m not in the habit of joining with the sighing for the non-existence of something; I’m in the habit of starting to plan the making of it, so I went to Tesco and bought a fleece and a towel.
Of course, it’s not pretty. I’ve hacked the towel to pieces and it’s not so much sewn into the fleece as tacked in but it’s holding up so far. My measuring was bad – I laid the fleece on the floor, put the towel on top and sketched with a Sharpie over where I could feel the seams and of course, they didn’t quite match when I cut the towel. There are gaps in the shoulders, which I might fill and I’ll see if there’s enough towel left to do the sleeves as well. Might need to get a second towel for that.
And because my ambition and imagination is greater than that Bluetit’s, I first added zips to the side pockets and then used the leftover orange nylon to make inners/linings for them. I don’t think I’m going to soak through the towel and fleece and I definitely don’t believe the nylon is watertight but I liked the idea of having an extra layer of protection for things like my phone and car keys. Hadn’t realised how huge the pockets are until I cut out the template – they’re 27cm top to bottom and 18cm at their widest, or to put it how my mum would understand, they’re nearly 11 inches tall and 7 inches wide. They’re not far off A4 size.
Oh, and the fleece is darkish grey and the towel is a bright jewel-toned pinkish purple so it’s quite the sight if I leave it unzipped, with this garish lining. Did I mention that the pocket linings are eye-burning orange?
Tent loops
The front of my big four-berth tent is only attached to the ground in the corners. That design was fine on my tiny old two-berth but scale it up to six feet of unsecured tent and the thing flaps and leaks. I ordered a sample of green nylon (because I knew I didn’t need another whole metre and I just couldn’t put orange loops on a green tent!) and I made some loops. That’s the easy bit. They then had to be sewn to the tent. I planned to pitch the tent and then sit and sew them on but then I got covid and couldn’t go camping, so I dragged the tent out to the garden and felt around for the front edge. I don’t know how well it’s going to actually work because I haven’t tested it out but hey, I’ve modified my tent to be more to my liking!

I’m also going to put some velcro along that front edge to hold the door properly closed but I think that one really does need to wait until the tent’s up. I’m not going to sew it. I hate sewing at the best of times but six feet along two edges of both the hook and the loop piece? That’s 24 feet! 48 if I do my usual style of backstitch, which is to go round a second time filling in the gaps. No, I’ve got some silicone glue (the internet, funnily enough, won’t tell me what’s the best kind of glue to stick long lengths of velcro to a tent).
I’m really enjoying making stuff! If I can’t find the thing I want or the thing I want doesn’t exist, I’m going to have a go at making it! I know I’m going to make a lot of compression bags for my waterproofs for hiking days with the orange nylon and I’m tempted to make a windshirt out of the rest of the green – if I do that, it’ll get a post of its own. Maybe this can become an annual post, all the things it’s occurred to me to try and make lately and maybe they’ll get more and more ambitious every year. Once you start Making Your Own Gear, it’s only a matter of time before you make a backpack and a tent.
