For the last little while, I’ve been kind of jealous when I go hiking with other people because their bags have little pockets on the hip belts. They’re really useful and my bag doesn’t have them! I like my bag and I’m not looking to replace it but I do want belt pockets. So I’ve finally decided it’s time to take matters into my own hands and make some.
How hard can it be? It’s just a little pouch – or two, depending on how the first one goes – that attaches to my belt with two elastic loops. The trouble is that there’s not really any design for this around because most people who want them buy a bag with them already built in, and what there is is home-made, semi-improvised and I’ve found the instructions unfathomable. So I made up my own pattern, and that really isn’t a pattern at all. I’m not helping here, because my pockets are also home-made and semi-improvised and my instructions are less step-by-step and more a stream of consciousness about what I did. But maybe it’ll be of some use?
I ordered some nylon, which seemed a good fabric to do it with. Well, I ordered some free samples. I ordered a metre of fleece, the minimum order, to make a hat and mittens and now I have a hat and mittens and the best part of an entire blanket left over, so I thought ordering a metre of nylon might be a bit much whereas the sample size might not actually be a terrible size to use for something small like a pocket. And if it was free? Well, bonus! But then my samples turned up, in three shades of green because I didn’t know which would match my bag best. They turned out to be three pieces 10x10cm, about the size of the palm of my hand and in lycra – exactly the same thin stretchy shiny fabric as my ballet leotard when I was little. Not the fabric I’d choose, even if there was enough of it to do anything with.

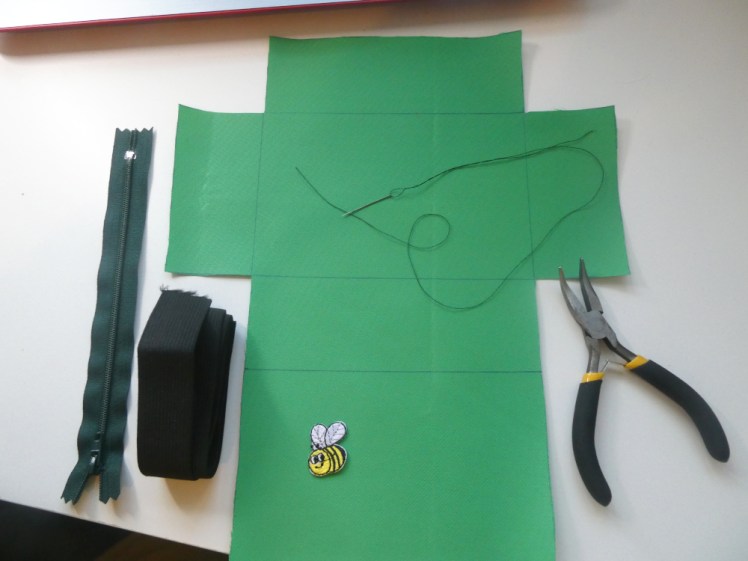
So I fell back on my old favourite and ordered a piece of cordura from eBay in Apple Green. I’ve used it before – I had a 12×12 patch in red to repair my caving suit and later used it to repair a camp chair for my Guide leader. It’s thick and it’s difficult to work with and I invested in a pack of heavy-duty needles to punch through it. This particular piece was a brighter green than I would have liked but still, it would do. I opted for a 12×20 inch piece. When I ordered it, I had no idea what I was actually going to make with it but 12×12 felt like it might not be enough, and in the end, I got two pockets out of it with just scraps left, so that was the correct decision in this case.
I made two rectangular boxes. You know when you make a box out of card, six squares with tabs that you’ll stick when you fold it into a box? I drew one of those, only with on tabs because I was just going to sew it. I measured the space on my belt and decided I comfortably had six inches on each side, which gives me enough a big enough pocket to actually put stuff in. Four inches high seemed to work and two inches thick. So I drew out my six rectangles on my fabric and cut around it. It may not be decorative but I filled in all the lines – I’d probably want them later on to guide me when I was constructing the pocket.

Ta-dah! I had a vague idea of what I was making! I knew I wanted my pockets to zip closed and I also suspected that on a six-inch top edge, a six-inch zip might not work as well as a seven-inch zip – I’d definitely rather have it spilling down the sides than not big enough to open wide enough for me to put stuff in. If I did this again, I might be tempted to even go for eight inches in future. So, my materials were:
- 12 x 20 inch piece of cordura
- 20mm elastic cut into two pieces about three inches long
- 18cm zip
- Usual assortment of needles, thread, scissors etc
- Pair of curved nose pliers – useful for pulling an obstinate needle through rather than wearing out your fingertips
I folded my pocket and began sewing the edges together inside out – the short ones to join the back to the sides. I knew the big panel at the top with no sides attached was going to be my front – well, it had to be. The zip couldn’t possibly go into the one with all the sides attached.

On my first pouch, I did my usual seam allowances – as close to the edge as I could go. However, cordura is kind of plasticky and sewing it with a heavy-duty needle is a bit like hole-punching it. Close to the edge, the plastic just broke and when I turned it inside out, some of the outer coating, the close-woven rough fabricky stuff, it came loose around the seams.

For my second one, I used an ordinary small sharp needle, which did the job just as well, and gave it bigger seam allowances and that seems to have worked – when it’s inside out, the seams are much neater and it doesn’t look like it’s all falling apart.

Now came the difficult bit. I started to put the zip in and realised it would be easier to do my elastic loops on the back sooner rather than later. In my first one, I sewed on strips and then sewed the ends together to make loops later. On the second, I thought it would be neater to make the loops first so I could have them turned inside out and then sew them on. No, that made it harder. I did a nice X across the back of the first pair but it was just too fiddly to do on the second. Didn’t help that I first started sewing them on the inside and got a long way through before I realised how badly I’d messed up. Also, on the first I realised the elastic was fraying so I used a match to just slightly melt the edges. That’s another thing that’s so much easier to do before you start any of the sewing.

Anyway, when I put them on the back, I measured a ruler’s width away from each edge then marked the width of the elastic from there, then put the ruler roughly across the centre and marked a line top and bottom. Result: two boxes to stitch the elastic to so that it was reasonably straight and centred.
Now the difficult bit. The zip has to go face down on the outside of the fabric. I marked the middle of the top and the middle of the zip and sewed from the middle outwards in one direction and then the other. I’m not experienced with zips so there are some small issues here. The first one actually went ok. I sewed it to one side and then I unzipped it and did the same thing to the other side. Then I could stitch up the last bits of the side and turn it inside out via the zip. I discovered I hadn’t gone as far as the actual zip opening so I had to redo that. It’s not exactly pretty but it’s quite good for a first major zip and especially for one on a curve. The curve, by the way, was no problem on the back – it’s really just one seam even if it goes over the edges. On the front, I had to turn the zip 90 degrees and stitch it down.

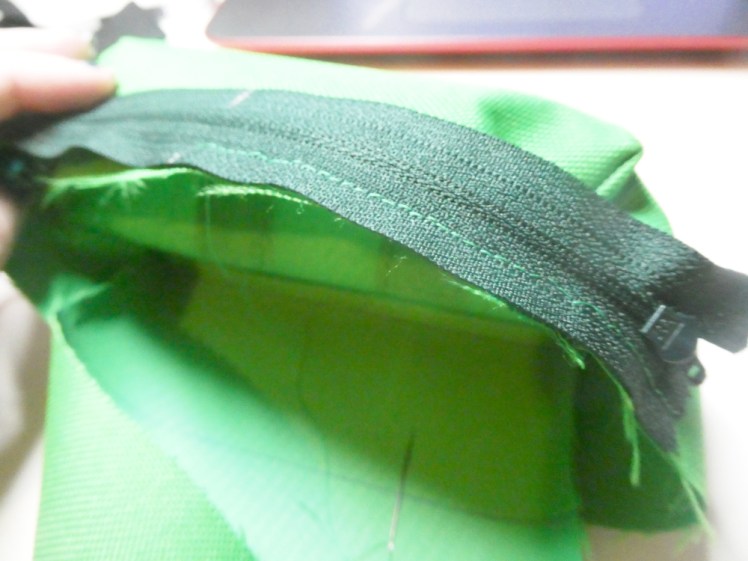

I was extra careful with those ends the second time, with the result that I’ve managed to seal it up nicely but with the zip ends on the outside, not the inside. It’s not pretty, but it is sealed. I also closed up the zip too much when I stitched the sides up and had to wrestle with it and a pair of pliers for at least ten minutes before I could get the zip open again and turn the pocket inside out.

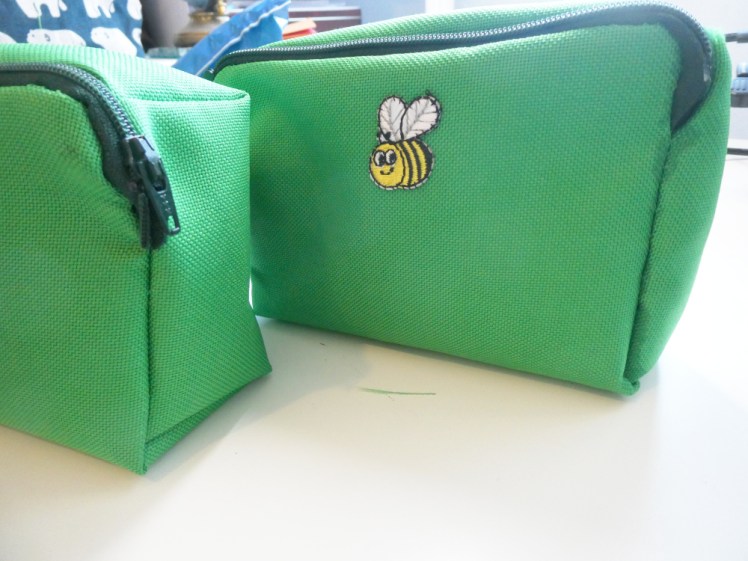
And that’s it. It’s really simple. I customised mine with an iron-on motif from Hobbycraft on the front – although I sewed it on – just because I’m so accustomed to seeing gear with a little logo that it looks like something’s missing if it’s plain. I also turned the first one inside out and painted some Mod Podge over the seams in the hope it would stop them breaking any further. That’s leaked through and is visible from the outside but in reality, no one will notice it unless I point it out.

The pockets slide onto the hip belt of my bag and hey presto – just like everyone else, I can keep small things like my compass and my snacks handy. If they get in the way, I can slide them back off but they fit snugly enough that I have to wrestle them over the buckles on the belt, so they’re not going to fall off by accident. They’re incredibly simple and yet with that zip, they’re the most complex things I’ve ever made and either way, I’m very proud of them.
Now, the next thing is to read obsessively about day bags for the next week, realise what other features my bag is missing and start to make them too…
Thoughts after use
Well, it’s now June and I owe you an update. I’ve used this bag properly only two or three times since I made the pockets and… well, they’re not great. It’s not the pattern, it’s the fabric. Cordura is too brittle, too fragile, which is ludicrous considering I thought it was just about the toughest thing. Yeah, against abrasion maybe, but even with good seam allowances, both my pockets just came apart at the seams, mostly along the zip. Since I made these pockets, I’ve made a small washbag from some luminous orange ripstop nylon so I’ve ordered a metre of that in dark green and I’m going to have a second go at the pockets. Bless past!me for writing this post because I couldn’t remember whether I used 18cm or 20cm zips – turns out it was 18. I’ll do another post later on when I’ve finished and tried out the nylon version and let you know how those go.
