This is kind of second in the How To Get Outdoors series but after Outdoors 101’s “what shoes should I wear?”, consider this the first part of related series Outdoors 201: we’re going to investigate why and how to use a route card.
What is a route card?
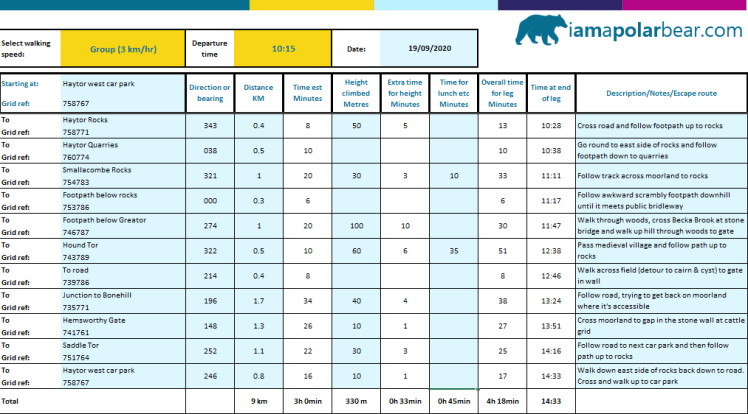
A route card is a piece of paper that you use to break your walk down into smaller pieces. If you’re doing a multi-day hike you have one per day, although each individual day might spill over onto two, or even three pages. It details distance and duration for each leg, creating essentially a detailed instruction manual for your walk.
Why would I use a route card?
Use 1
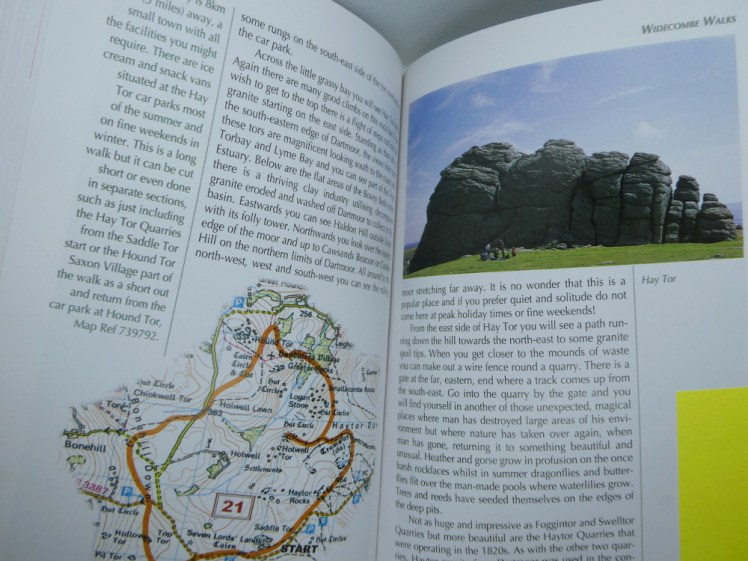
For your own convenience. I have a Dartmoor guidebook but the maps are too small and the route too big for them to be much use and the writing is rambly with a tendency to go off on tangents about history. Which is all fine but when all you want is to figure out where you’re going next, it makes it difficult. So I sit down in advance and cut through the waffle to turn it into a cold-blooded route card.
On a similar note, you may be planning your own route without the help of a guidebook. Can you remember where you were planning to go yesterday when you’re standing in the rain at the top of a hill you weren’t expecting? You don’t need to, it’s all written down.
Use 2
Because route cards contain timings as well as direction, they’re a handy thing to leave with someone in case of emergency. That person will know if you’re late back and will know exactly where you should have been, allowing potential rescuers to zone right in on you. Unfortunately when we do the Dartmoor walking weekends no one leaves a route card back at the house and although I don’t usually bother doing a card for my own walks, it doesn’t occur to me to leave it behind either when I do.
Use 3
For your own emergency assistance. You fall down and break your leg so you phone mountain rescue. Where are you? Well, hopefully you’re keeping track of where you’ve been going, so you know you’re on leg seven. You’re between grid reference A and grid reference B. Thank you very much, says mountain rescue. Now we can come directly to you instead of spending hours searching several square miles.
Use 4
A souvenir. Do you keep a walking logbook? Probably not. But I do, because I’m eventually going to do my level 2 walking qualification and I need 20 logbook walks. How many times have I filled it in immediately after my walk? Zero! So having a route card I can either stick in or, more likely, cannibalise to fit in my logbook spreadsheet is really useful. Where did I go? How many kilometres? How long did it take? I can go from “no idea” to “here is every conceivable detail” in an instant.
That said, I reserve route cards for Serious Walks. Two to three hours with my dad on the local map, not going to bother. If map and compass might be required, then yes.
How to make a route card
After spending hours with a calculator getting frustrated at trying to figure out how long each leg took, I realised I am a nerd who is paid to play with spreadsheets and so I created an interactive version stuffed with formulas that takes away the really tedious slow bits.
You can download my clever self-calculating route card here
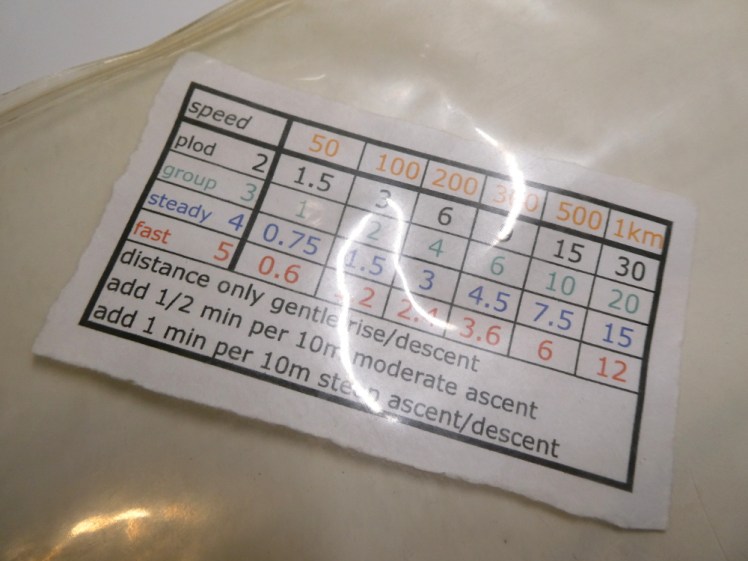
It’s so clever and I’m so pleased with it. You have to enter an approximate walking speed and a departure time and it will calculate everything. I operate on 3km/hr (“group”) because that’s what we use on our walking weekends and it seems to suit me but you can use whatever you think works for you. It’ll tell you what time you finish each leg, what time you’ll finish the walk, how far you’ve gone etc.

How to fill it in:
- Enter your starting location in the box at the top. You’ll need to figure out your own grid references and if you want me to show you how to do that, leave a comment and I’ll do a blog post on map basics.
- Now, decide where your first leg is going to end. I generally pick the next point at which I’ll change direction. Give it a description in the first box and figure out your new grid reference.
- Fill in approximately what direction you’ll be travelling. I just use compass points but if you’re more into bearings, you can put that here.
- Next, measure your distance. This is the slowest, most tedious part of route carding. You could use the scale on the edge of your compass or a piece of string. Pop it in the next box and the magic will tell you how long it’ll take you to walk, according to the speed you’ve picked.
- Now, we all know hills are hard work. If you’re going uphill, count your contour lines and write in the height climbed. The calculator will add one minute for every ten metres climbed and then add that to your total time for the leg.
- If you like, you can add extra time. It’s probably a bit early for a lunch stop on your first leg but make sure you include that somewhere. You might want to stop for a tea break or a rest or to practise your map & compass skills or to paint the landscape. Anything you like but stick it in this box to account for it.
- Now the route card will tell you approximately what time you should be completing the leg. Don’t worry about following it to the second, this is to give you a guide. For future reference, I’d take a pen with me and note down the actual time so I can figure out whether I need to change my walking speed next time.
- Finally, any notes. This might be an escape route, ie how to get help in an emergency, it might be “don’t shortcut this bit because the shortcut goes through the mire”, it might be notes on what to notice and/or avoid on that leg or where to find the path or instructions for when you don’t want to be quite so technical as to depend on the compass.
- Move to the next line, figure out where your second leg ends and repeat until you get to the end of the walk.

It’s quite a tedious process, I admit, but there’s nothing quite like having instructions for every turn and every hill listed in black and white, especially if you’re leading a group. Maybe you’ll realise that your route is too long once it’s written out or that it’ll be dark by the time you’re projected to finish. Forewarned is forearmed: you can change the route or change the start time or scrap it altogether.
A couple of warnings: this route card is designed to work in metric. If you’re measuring in miles, your time is going to end up hideously wrong. It’s also meant to be used alongside a map and compass, which means you have to know how to use your map and compass. Don’t just blindly follow your bearing and distance; each leg is a rough guide and you’ll never be able to walk a perfect straight line that precisely matches either the map or your measuring and bearing skills. This is an enhancement to your existing skills, not a replacement for them.
How to use the route card
This is pretty self-explanatory and I’ve mostly covered it up above. Start where you planned to start (I failed with this very card by accidentally parking at Haytor when the original plan on the original handwritten route card was to start at Saddle Tor), see what direction the card says to walk in and how far, or for how long. When you get there, go to the next step. Provided your route card is reasonably accurate and your map reading and following is reasonably accurate, you should arrive at your end point at approximately the time the route card says you will. Don’t worry if you don’t. Maybe you need to adjust your chosen walking speed on the card next time or maybe you made some stops that you hadn’t taken into account. It’s a guide. It’s several pages of guidebook condensed into one easy-to-follow piece of paper to help you remember how to do your walk.
If you want any other map & compass content, please let me know. I’ve been taught by the best and although I myself am not the best, the ladies in their seventies and eighties aren’t going to be writing any blogs so leave your questions below and I’ll help out in a future blog.

One thought on “Outdoors 201: Why and how to use a route card”