This week, I’ve seen this Guardian article – Three-quarters of UK adults can’t read a map – going around my social media several times. It’s one of these classic “what’s happened to the world??” articles designed to get older readers tutting.
Now. This is a write-up of the results of a poll by Ordnance Survey, which primarily notes that 77% of adults can’t recognise OS map symbols, 56% have got lost because they couldn’t follow a route and 46% are happier walking with someone else.
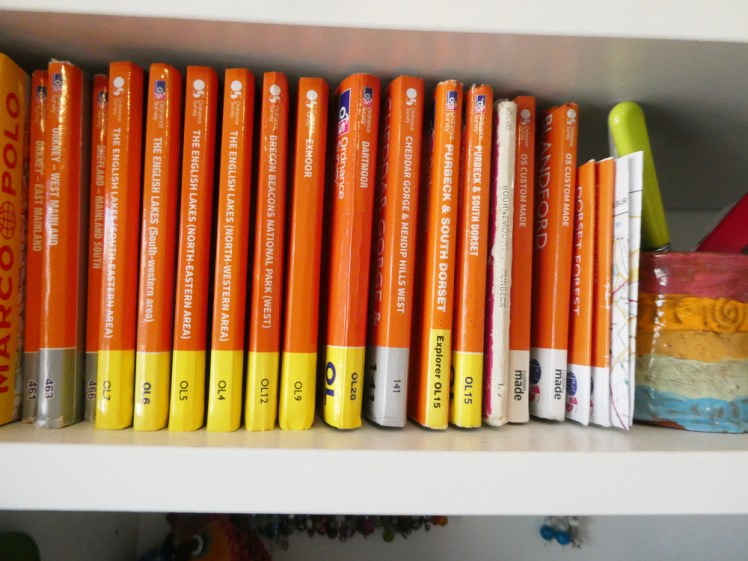
To most of those 77%, it just doesn’t matter. Not everyone’s into walking and most people will go through life completely oblivious to OS maps. I have a shelf of OS maps behind me because when I’m not feeling lazy, I do a bit of strolling. Some I’ve bought for a single walking weekend, some I’ve bought for future adventures or adventures that never happened and a few I use regularly – my Dartmoor and custom local ones are particularly battered. But let’s go through all the people I used to work with pre-pandemic: only one of them does any walking, which leaves six or seven who’ve probably never even seen an OS map. Does it matter that they wouldn’t know how to read one? No!
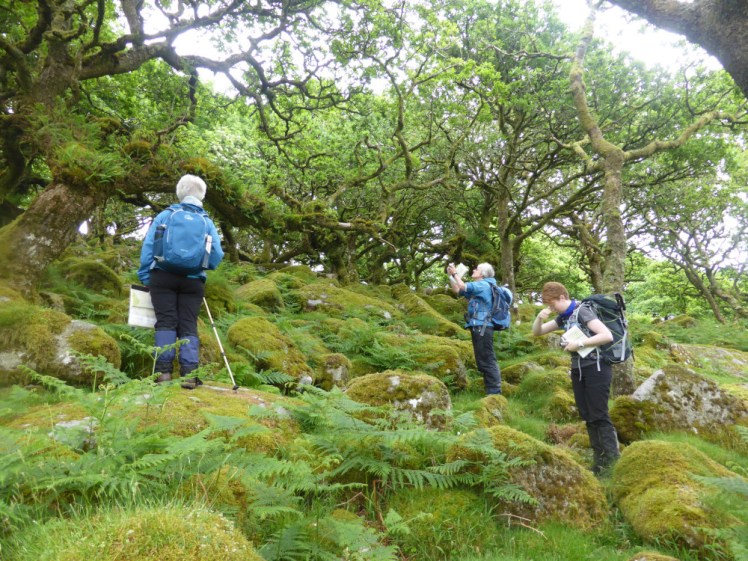
As for the ones who are happier walking with someone else, I’m not at all surprised that’s nearly half the people polled. If there’s one thing I’ve noticed in 14 years as a solo traveller and adventurer, it’s that a lot of people think it’s weird to do anything on your own. And that’s before we get to the bit where you’re somewhere fairly remote where you might appreciate safety in numbers not just for navigation but in case you run into dangerous strangers, a herd of cows or a rabbit hole that makes you break your ankle.
The concern is for people who do go out walking and adventuring who don’t know how to read a map. The idiots who’ve never walked anywhere in their life and suddenly decide on a whim to climb the nearest handy mountain in the Lake District because it’s such a nice Saturday. The people who make a living from the outdoors in whatever form. People like me who want to do a weekend on Dartmoor once or twice a year. If 77% of them can’t read a map, that’s when we should be concerned, not when random indoor-types can’t.
I’m old-fashioned – I’ve had elderly teachers – and I’m 100% a fan of paper maps over digital ones. Paper maps don’t run out of battery or signal, they don’t fail when it gets too cold or too wet (well, as long as you have a waterproof map case), they’re big enough to give you a bigger overview of the area in case you go off-route slightly or get horribly lost, you can’t confuse yourself by zooming in and messing with the scale and your maps can’t vanish because your subscription expired.
But even if you do trust your digital maps, and I know a huge number of people do, you should always have a paper map and compass as a backup – and know how to use them! I subscribe to The Great Outdoors magazine (oh, I have thoughts and feelings about this magazine!) and I’m always astonished when they do a feature on paper navigation as if it’s something novel and exciting and new and not the absolute basics of hillwalking that everyone should know before they even pick a hill to climb.
Reading maps isn’t that complicated. Applying the compass to the map isn’t that complicated either. Don’t be intimidated by it. Let me show you the basics.
The compass
You can spend a lot of money on a compass. They come with so many features and can get really complex with mirrors and lids and extra lines and a lot of stuff I can’t use. For 95% of us, all we really need is a simple Silva type, where there’s a base plate and a rotating housing with degrees marked on it. That’s Silva-type, it doesn’t actually have to be of the Silva brand, although I’m going to show you some of the Silva ones for reference.
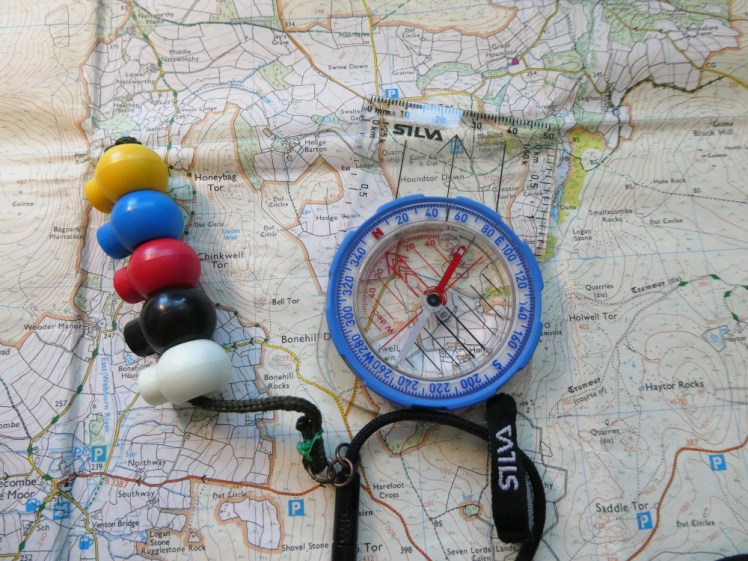
Mine is a Field, I think, although it’s a slightly older model than the one currently available – the fact that the bezel is black instead of blue is throwing me slightly but I don’t think it’s the Starter 1-2-3 because I’ve got a ruler along the front edge, like the Field. The current one is £19.99 but there’s no reason why you shouldn’t pick the £14.99 Classic – the only real difference is that the bezel is blue and that the base is a little bit longer, which means more measuring room. I mean, get the £59.99 Expedition Global if you really want but if you’re reading this, the simple ones will do everything you need it to.
It has, obviously, an arrow that points north. It has a red arrow drawn inside the bezel. It has a black arrow on the base plate. It has degrees marked around the bezel and it has distances marked along the sides of the base so you can literally measure the distance on your map, as long as you’re using the right side for the right map. It does everything someone like you or I needs.
Attached to it are pacing beads, which are just toggles on a length of paracord that I made myself. The compass is a necessity; the beads are not. They’re handy but you don’t need them as an absolute beginner, here’s-what-you-need-to-take-on-the-hill. I slide one up every time I walk 100m and there are five, which allows me to measure 500m. You can buy these ready-made but they have more beads and I think you can walk 5 or even 10km on them. For me, at the distances I’m going, I’d go off my line at that kind of distance so 500m is plenty.
To use them, you need to know how far 100m is for you, if you see what I mean. Find yourself a flat line of 100m – we measured a stretch of road using the edge of the compass but you can measure it with your phone – and count how many steps it takes to cover it – one step being from the moment one foot lifts off the ground to the moment it touches down again, so double-steps, as my dad thinks of them – he prefers to take great inaccurate lumbering “one yard, two yards, three yards” lunge-steps. For me, using the standard double-step pacing method, it’s around 70 paces to 100m – or it’s close enough to be reasonably easy to calculate with and over 500m, it’s accurate enough for my purposes. That’s why we don’t pace any further than that – you’ll go off course.
The map
The best-known maps are the Ordnance Survey maps. In fact, OS is behind a lot of maps – did you know that they’re the mapping brains behind Google Maps, or at least the UK portion of it? They’re very good at what they do, they have a constant program of updating using a small plane and an incredibly expensive camera and frankly, I don’t think there are any other maps in the world to touch them.
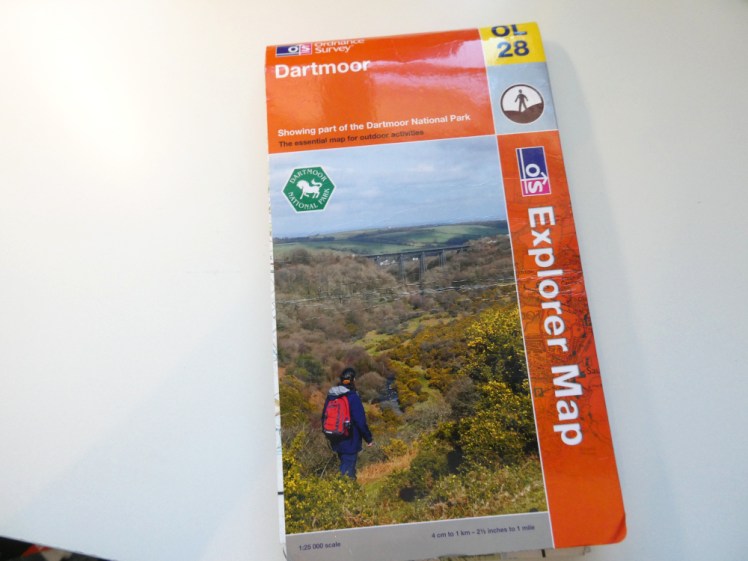
They have an assortment of maps – the two that are relevant to walking and outdoors pursuits are the orange Explorer series and the pink Landranger series. Explorer is the one I use – they’re the smallest scale, which means they have the best detail and they’re at a 1:25 000 scale, which means 4cm on the map to 1km in real life. Landrangers are double the size, so they’re 1:50 000 which is 2cm to a 1km. They give a bigger overview but they don’t get into quite as much fine detail. For the purposes of today’s post, we’re using an Explorer – specifically, the OL28, which is the Dartmoor map.
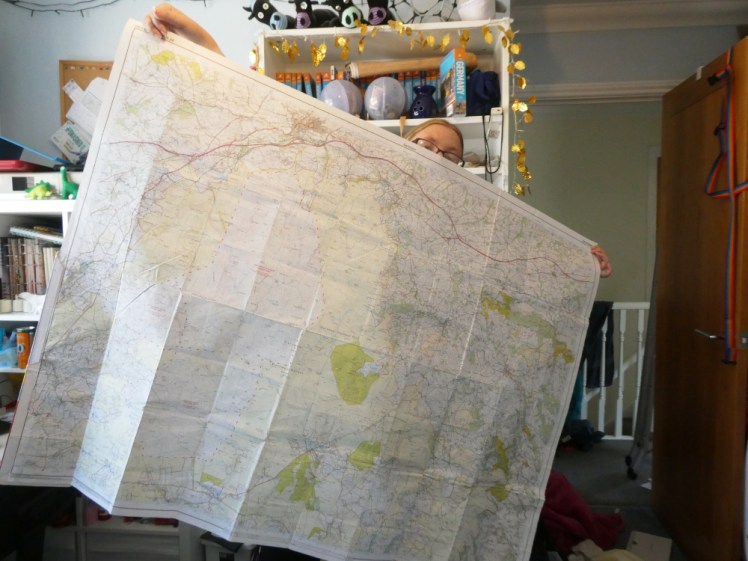
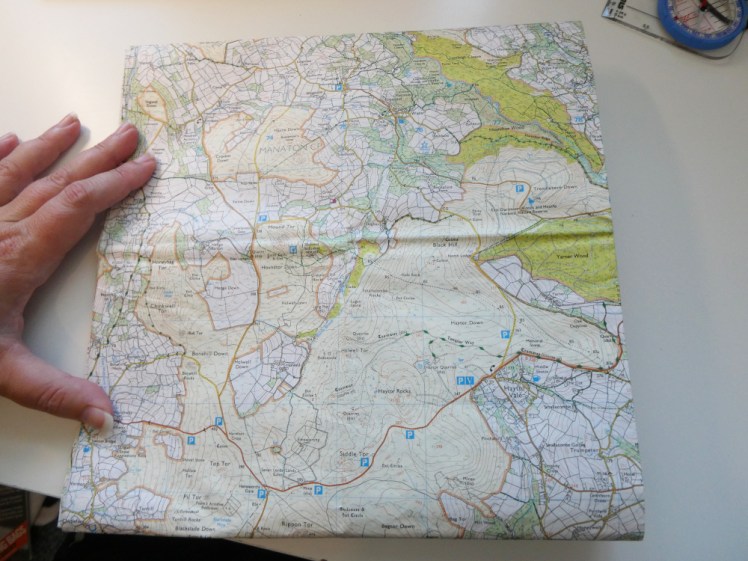
This thing is big! It’s double-sided too, so it’s unwieldy. Before you head out, find the bit of the map that’s relevant and re-fold the map so that’s the bit you can see – yes, you’re going to have to get used to folding the map in the “wrong” direction and even creating new folds sometimes. It just adds to the character of the map. If you try doing this in a breeze outside, you’re going to discover there’s very little difference between a large OS map and a sail.
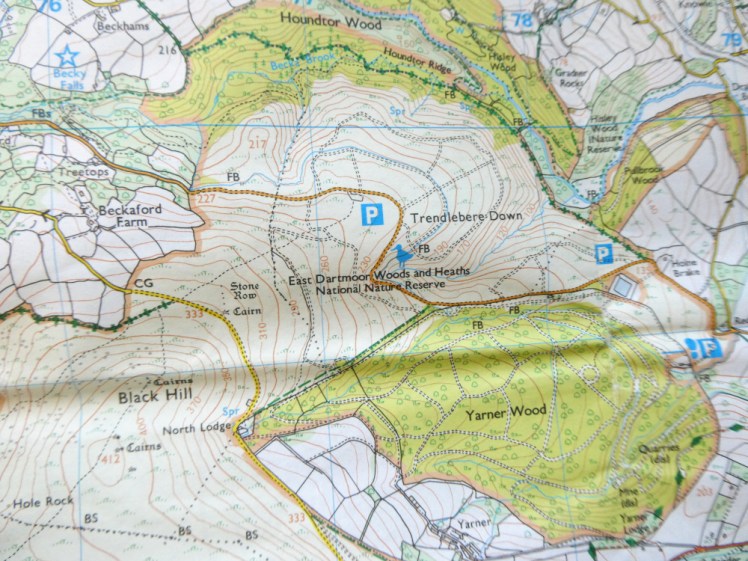
Here’s mine folded awkwardly (it’ll stay flat once it’s in the map case) to show the Haytor/Hound Tor area which is where we do our beginner courses.
A few features of the map
Let’s get close-up with Haytor. See the faint blue grid over everything? Each of those blue boxes is 1km to a side. 4cm felt odd earlier, didn’t it? Now it looks fine. So you can get a very rough idea of how far something is by counting the blue boxes between them.

Next, see the orange circles around Haytor? Those are contour lines. These ones are spaced 10m apart which means every time you cross one, you’ve gone 10m higher up. Sometimes contours are only 5m but if you follow them, you’ll find enough numbers marking the literal height to be able to figure that out. The closer the contour lines are together, the steeper the climb. On Haytor, you can see that the steepest side is the south-west and the gentlest side is the north.
A ring of concentric circles is a hill and a line of close-packed contours is something cliff-like. U-shaped contours shows a valley and depending on how close-packed those contours are, it might be a really steep valley more like a canyon or a great wide prairie. Black lines forming lots of odd-shaped boxes generally are fields – a lot of them are private land but if you come across them in open access land, they can help guide you along your route.
Dartmoor is covered in ancient features like tumuli, hut circles, stone circles, barrows and so on. Plenty of them will be virtually non-existent in real life but as a general rule, you’re probably going to find a line or a ring of stones.
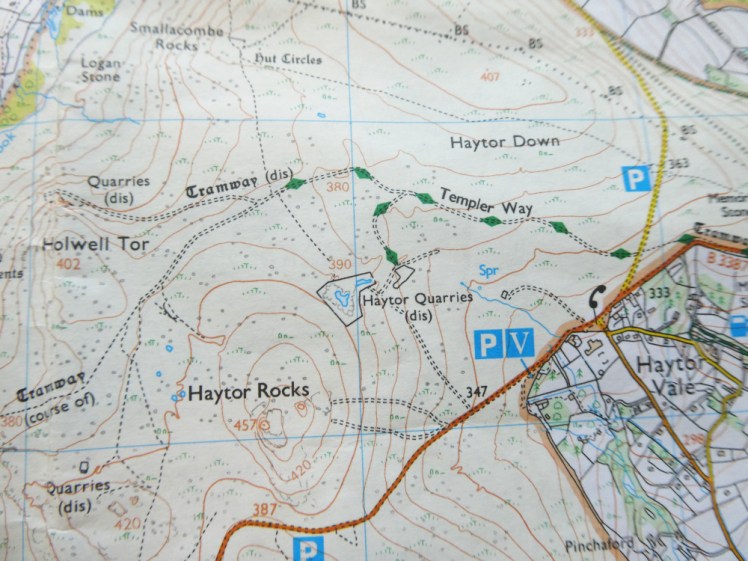
Next, do you see a line of green diamonds to the north-east of Haytor? That’s a National Trail or recreational route – a path, usually good quality and easy to follow, that has a name and a defined route. In this case, it’s the Templer Way, which is an 18-mile trail going from Haytor to Teignmouth, following John Templer’s route to transport clay and granite from the moor to the port for export. National trails are great, treasure them.
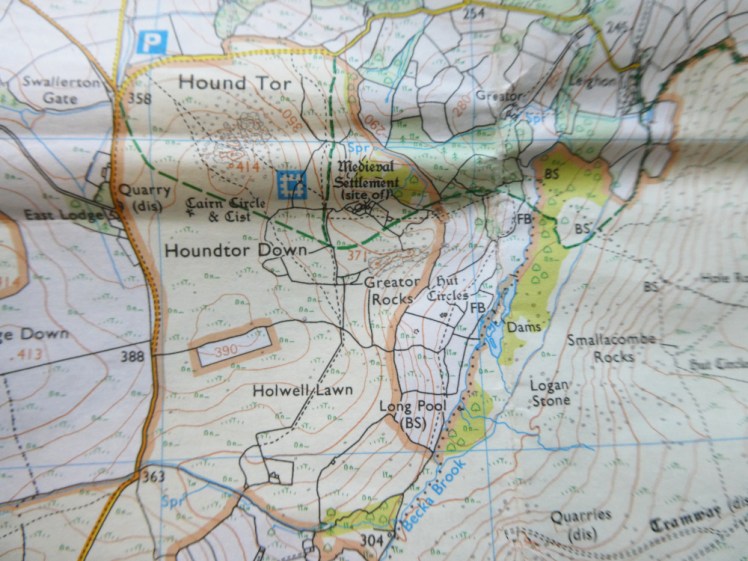
What you’ll use more often is a nice thick green dotted line – well, it’s more a dash than a dot. That’s a bridleway and you can see one crossing Houndtor Down, to the north-west of Haytor.
Light dashed black lines, like the one that crosses Saddle Tor, are paths – the relationship between what’s on the map and what’s on the ground can be… well, hazy. I wouldn’t necessarily expect to see a path in real life.
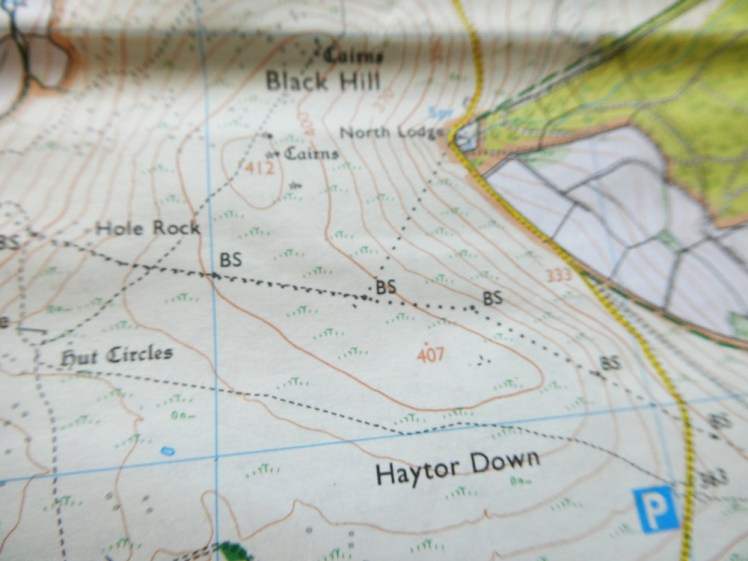
And your false friend: between Haytor and Black Hill is a line of black dots. That’s not a path, that’s a parish boundary. Sometimes it’s a physical boundary, sometimes it’s an invisible boundary, just like the borders between many countries. Sometimes all you’ll see is a line of rocks that you might not even notice without the boundary line on the map. They’re what’s marked BS – boundary stone.
Thick orange, reddish-pink, yellow and white lines are roads of various sizes. I wouldn’t walk on the reddish-pink ones most of the time because they’re major roads. Orange can be variable – the orange road by Haytor is fine, as long as you look before crossing the road. Yellow and white roads are usually quiet but on the other hand, they’re narrow and often bendy, which means you don’t often have visibility on the few cars using them.
Everything else on the map is fairly self-explanatory. Green areas with trees drawn in them are patches of woodland. Little tufts of grass are grassland and little tufts of something blue near a stream generally means it’s boggy. Yes, blue lines are waterways, obviously. The bigger the river, the bigger the line. The word “ford” means you can probably wade across – be really careful about this and use your sense. I can’t see any on this bit of map but there’s a little symbol for a bridge, which you’ll recognise when you see it.
Last, this entire area is yellow with an orange border. That means it’s open access land which means you can walk wherever you like. If you leave the yellow-orange area, you have to stick to paths and lanes and official routes. A word of warning: it is not entirely unknown for farmers or landowners to disagree that they own a bit of open access land and to be difficult about letting you walk across it, even though the law is on your side. If you do find yourself somewhere that seems to “belong” to someone, try to be delicate with where you’re walking and play “see, walkers are good and considerate”.
Symbols
Since one of the things the article complained about was symbols, let’s do them. They’re bright blue, you can’t miss them. The one you’re mostly interested in is a big P in a blue square. That’s somewhere you can park your car, fairly obviously! A little blue pint mug is a pub, sometimes marked PH, sometimes marked with both. A V in a blue square is a visitor centre. A bird with long legs and a long beak is a nature reserve and a sort of half-sunburst is a viewpoint. Obviously a tent/caravan is a campsite and you’ll also find little National Trust and English Heritage symbols in blue lurking on maps. There are dozens of other symbols and you can check the key to find out exactly what they are (it’s on the back of the Dartmoor map, which makes it awkward to get at if you’re sitting at your desk).
Applying compass to map
I could – and maybe will – do an entire post on how to navigate using the compass but these are the basics:
Measure the distance
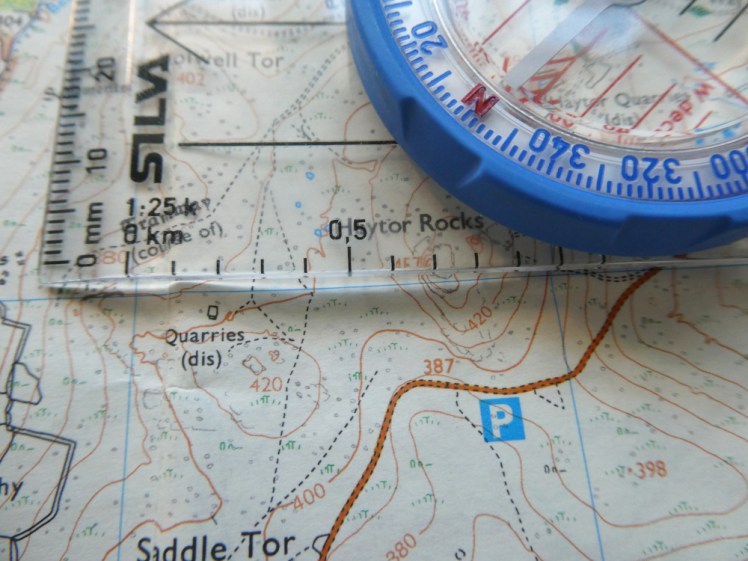
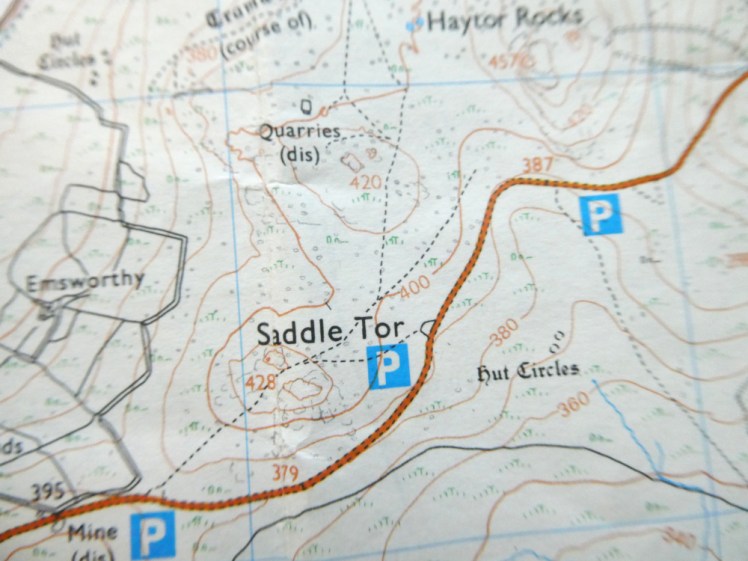
This is a 1:25k map so I’m going to use the left edge of my compass. I’m going to lay it down between the top of Saddle Tor and the top of Haytor and so we can see that if we walk in an absolutely straight line, it’s 900m from one to the other.
Finding a bearing
Next, I turn the bezel so that the lines inside the dial line up with the blue north-facing lines on the map (ignore where the needle is pointing; I’m doing this at my desk, which is not on Dartmoor so the compass doesn’t match what’s on the map. In real life, you’d turn yourself and the map before you start on this). Now look at the numbers around the edge: it’s at about 44° – or 044, because bearings are three digits. Now, to walk from Saddle Tor to Haytor in a straight line, you turn the entire compass so the red arrow lines up with the north marker inside the dial and follow the black arrow on the base plate. At my desk, that looks ludicrous but I promise it’ll make more sense when you’re actually there.
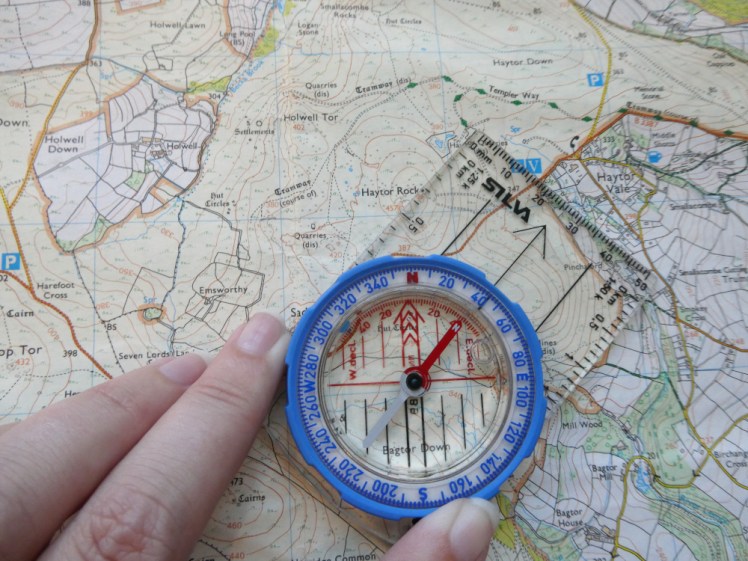
When you’re using bearings, try to make the sections short. Break down your walk into lots of smaller legs and take a new bearing for every time you hit a new landmark and change direction slightly. For my walk from Saddle Tor to Haytor across to Hound Tor, I’d take Haytor as my first landmark and bearing, then the corner of Haytor Quarry, then the tramway, then Smallacombe Rocks, the footbridge (FB) at Becka Brook, Greator Rocks, where the three bridleways meet below Hound Tor and then Hound Tor itself.
You can then take all these bearings and write them down into a route card, which is an intimidating-looking document whereby you do the navigation before you head out and you just follow your own instructions when you’re out in the wild.
Taking a bearing
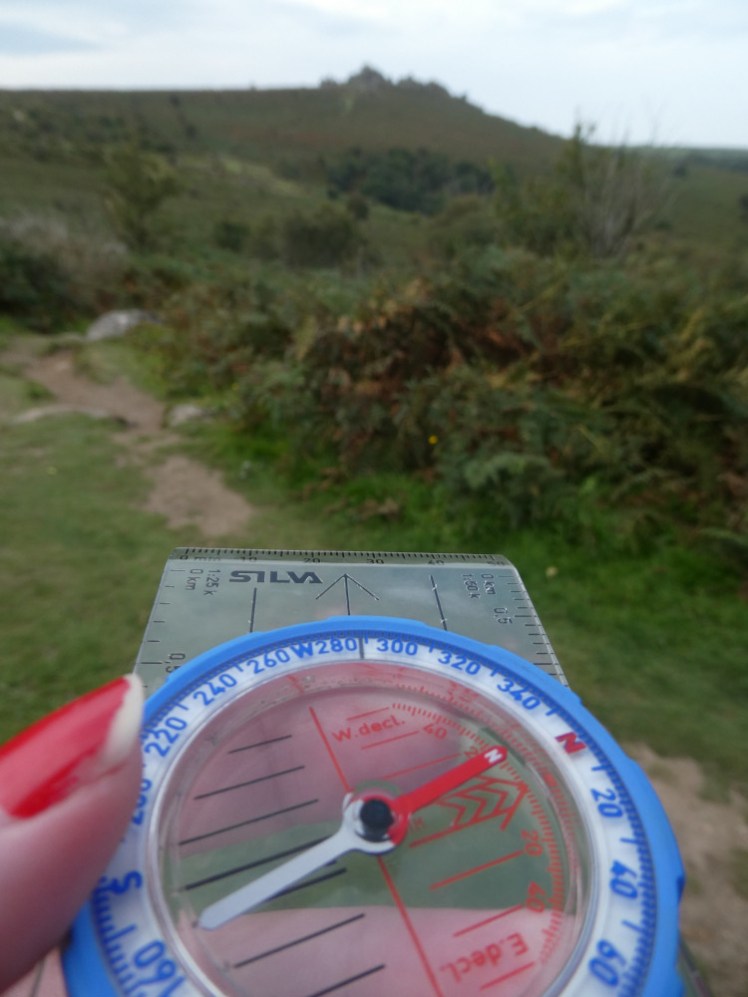
When you’re out and about, you take a bearing by pointing the black line on the base at whatever you’re aiming for, then turn the bezel so the red spinning arrow lines up with the red arrow drawn on the bottom of the bezel. Now you can use that to make sure you’re walking in a straight line towards that feature or you can compare it to your map to check that the feature you’re looking at is what you think it is on the map.
Finding yourself on a map
I used to go walking with an elderly lady called Sandra who used to stop the group and ask where we were. If you say “I think we’re here” or “Are we here?” or even “We’re here?” you’d get a metaphorical slap in the face. You should know where you are. Sandra knew exactly where we were, by the way. It was a test, not an actual question.
To do that, you take at least three features that you can see. You see a hill not too far away. You know roughly where you are because you’ve kind of been following the map. So maybe that hill over there is that one there on the map. There’s a good path running directly across in front of you. Find that on the map. There’s a stone circle over there. There’s a stone circle in roughly the right place on the map. And with those three features, you can say “Well, that’s there, that’s there and that’s there so that means I’m here.” Take bearings to each of them and check them against your map – if you’re where you think you are, the bearings will all be correct on the map. And then you can tell Sandra nice and confidently “We’re here“. By the way, when you’re doing that, use the corner of your compass as a pointer – it’s more accurate than your sausagey-fingers. No, I know, you might have lovely long slender elegant fingers. They’re still sausages compared to that nice sharp corner of your compass.
I don’t have the insurance – or any qualifications – for it but I’d love to do a group hike one day in the Haytor area where I just teach the absolute basics of map-reading and we take four times as long as the distance requires because we’ve spent it looking at the map. Maybe I’ll make a video at some point.
