I meant to do this last year but apparently I never did: a beginner’s guide to how to pitch a tent. It’s all very well to decide you’re going to try out this camping thing, to go to a shop and buy a tent, but how do you put the thing up?
Tents come in various shapes and sizes. I know nothing about bell tents or teepees or tents that have a centre pole so you’re probably best looking for more expert advice but I know about dome tents and tunnel tents and the following advice covers all sizes of tent. It’s quite a long post but it covers everything I can think of and you don’t need to read every last word.
The more hands you have, the lighter the work. With practice, you can pitch a small tent single-handedly no problem. With practice and experience, you can probably pitch a large tent single-handed. It’s so much easier with more people and so much quicker but it’s not necessarily completely impossible to do on your own. See me, in a garden approximately the size of a six-man dome tent, putting up a wet & muddy six-man dome tent on my own in February. So much easier with help.
Step 1: unpack your tent
There are various components. You’ll probably have an inner and an outer. The outer is also – and probably correctly – called a fly or flysheet but I assume you’re reading this because you’re a beginner and it’s easier to call them inner and outer, which is what I’ve always called them anyway. The outer is waterproof and the inner is less so. Try to keep your inner dry as you’re putting the tent up – don’t leave it lying on damp grass, don’t leave it unprotected in a rainstorm and so on.

Tied to the tent at various points are a set of ropes called guys. My kids insist on calling them guide ropes and they’re not, they’re guys. But to confuse the matter, our English word does come from a French word meaning “guide”. But get the word guy in your head right now. You’ll also have a bag of pegs and then you’ll have the first thing we’re going to use: the poles.
Step 2: assemble the poles
Modern tent poles are usually made of fibreglass or very occasionally aluminium, more often for straight poles that hold up an awning, if your tent has such a thing. They’re reasonably flexible so they bend into nice hoop shapes and sometimes they break. The post on how to fix poles is coming next time.

Your poles are strung together on a piece of elastic and they should fit together, end to end, one inside the next. Put them all together and lay them out on the ground. Don’t stand on them and watch what you’re doing when you’re handling them. Even on a small tent, a complete pole is long and wobbly enough to cause a mischief to anyone who comes too close. Don’t lose the pole bag; put it back inside your tent bag right now.

Step 3: fit the poles to the tent
There are two small problems here. Number 1, some tents pitch inner first and some outer. Mine is outer first but have a look at your tent. If it’s outer first, your outer (usually the more colourful bit) should have some sleeves or channels for the poles to run through. It might only have them in the middle and then the poles just hook onto the fabric lower down or it might be hooks only. That’s something you can only figure out from looking at your own specific tent.
I’ve not experienced many inner-first tents but I think they’re more likely to have hooks than sleeves, and when I say hooks, I mean chunky plastic half-loop clips that will hurt your fingers when you clip them on or undo them later on. You shouldn’t be able to miss them.

The second problem is identifying which pole goes with which sleeve/set of clips. If you’re really lucky, like me, your poles will be colour-coded. If not, there are two broad rules of thumb. If one is shorter, it probably goes right at the front, over the porch. If one is grey rather than black, it probably goes right at the front, over the porch. And if one has a single grey section in it, you’ve guessed it, it probably goes right at the front, over the porch. But other than that, you may find you have to trial and error. Might be good to mark which pole is which with a metallic permanent marker or a swipe of paint for future reference once you’ve figured it out.

Before you do anything, make sure all your doors are zipped up, otherwise you might pitch the tent at an odd angle that makes it impossible to close them. Once you’ve matched a pole with where it goes, slide it in. If you’ve got a sleeve, make sure you always push your poles through. If you pull, they’ll separate and you’ll have fun trying to rejoin them through the fabric. Worse, if your guy ropes are attached by eyelets, the elastic can get tied around the eyelets. My Guides did this to one of their tents while practicing out the back of the hut once. Never ever pull your poles. By the way, if you can establish which goes on the porch, it’s usually best to leave that one until last but it’s not a disaster if you don’t.
When you’ve pushed it all the way through, you should find it attaches to the bottom of your tent. You may have a knobble on the end of your pole that you push into an eyelet or you may have a spike on a ring that needs to go up the inside of the pole. Once you’ve secured it, hold it tightly. This works best with a second person to hold it, especially as your next step is to stretch your fabric, but you can do it alone. The smaller the tent, the easier, but I’ve put up a six-man by myself.
You now need to secure the pole at the other end and that means making sure the fabric all the way along the pole is nice and taut and that the pole itself is beautifully bent. This bit is usually the hardest, so don’t worry if you struggle. That’s normal. Swearing at it can be helpful, depending on who’s nearby at the time.
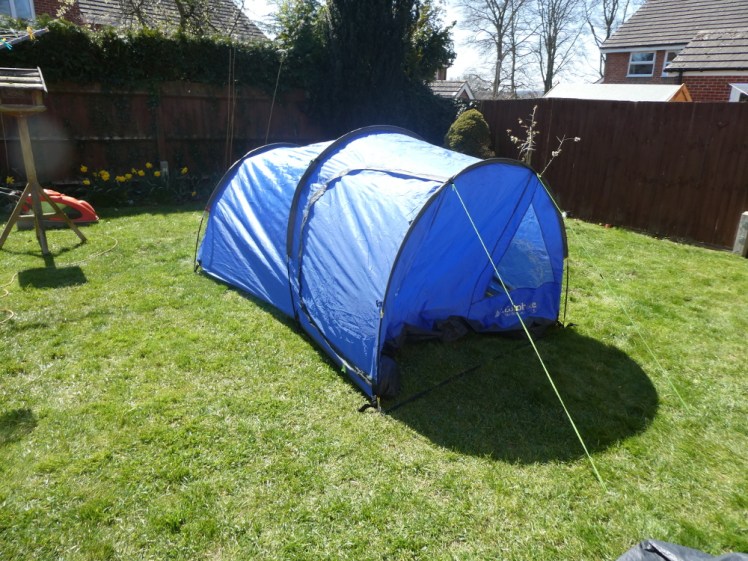
Once you’ve got it in, you need to do the rest of the poles. If you have a dome tent, your two main poles will cross in the middle and your tent will more or less stand up by itself. I love dome tents. If you have a tunnel, you’ll have a number of parallel hoops and it won’t stand up by itself. I find this makes tunnels a little harder to deal with but it can make the interior a little more roomy and ultimately, it’s down to what you prefer and often, what your wallet prefers, and that varies from shop to shop and from day to day. My old tent is a dome; my new one is a tunnel and my Rangers have a couple of each.
Step four: pegging it down
Now you’ve got it halfway up, you need to decide which way to face it. With a dome tent, this is easy. Identify the main door, decide which way you want it to point and then walk the tent round in a circle until it gets there. Especially with a larger tent, this is done most easily with a person on each corner but you can do it yourself if you’re gentle and take your time. With a tunnel tent, you’ll have to drag it around on the floor and I find surface tension makes tunnel tents really awkward to handle.
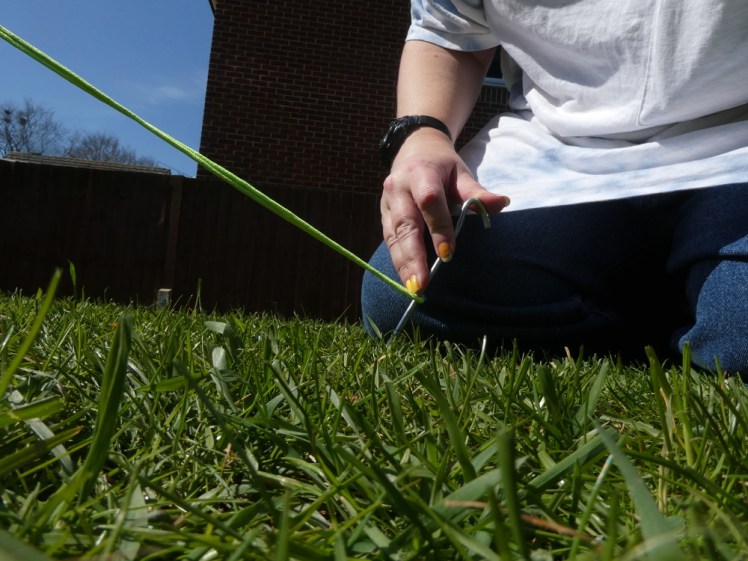
Once you’ve got it facing the right way, find the front set of poles touching the ground – this usually means the two on either side of the front door. It doesn’t mean the porch, not yet, and it definitely doesn’t always mean two ends of the same pole. There should be a loop of some kind at the bottom of the poles. Take one of your pegs, put it through the loop to find the right place, then take the rope off and bang the peg into the ground with a rubber mallet.

Do the corners here, plus any at the bottom of hoops on tunnels and the ones in the corners of your porch. Leave the others until later.
Some peg tips:
- don’t use your foot to stamp on it, you’re liable to turn the peg and bend it and there’s not much you can do with a badly bent peg, to say nothing of the risk of the peg going through your foot.
- The peg should lean away from the tent, at about 45 degrees, with the top further away than the bottom. If the peg leans towards the tent, any movement will pull it straight out of the ground and putting them perfectly vertically is little better.
- Get the pegs as far in as possible. It makes them more secure and less likely to come out and it’s less of a trip hazard or foot-impaling hazard and it’s also less likely that the rope or loop will slip off.
If you have a dome tent, just go and give your back poles a bit of a nudge until they feel like they’re sitting where they want to and repeat. If you have a tunnel tent, pick up your next hoop and pull it back until the fabric between the hoops is nice and taut – and I freely admit, I’m quite bad at this. At this point, your tunnel tent still wants to collapse. Tolerate it. When you’ve got your second hoop in position, peg it down in exactly the same way and then do the same for however many hoops you have.
Step five: guy ropes
These are the heroes of the tent, they’re what really hold it down. Let’s go back to your tunnel tent. You’ll probably find that you’ve got a rope on the back and a rope on the front and pegging these out is what’s finally going to get that tent upright. If you have a dome, it’s already upright but the guys will probably help to make your porch a good shape and of course, they’ll secure your whole tent properly.
(If you have a tent that pitches inner-first, your guys are probably on the outside, in which case skip to step seven, then come back to this one.)

Some guys are on poles. Pull them out in the same direction as the poles. So for a tunnel tent, pull them out at right angles to the tent and for a dome, pull them out a 45 degrees, just like the line of the pole they’re attached to. You’ll have a slider to adjust the length. You want to peg your ropes out a little distance from the tent but not so far that they’re an excessive trip hazard. Adjust your rope to a suitable length, put it to the ground to figure out where it’s going to go and then put the peg in without the rope round it. It’s not good for tent to have their ropes banged into the ground. Get the peg in the ground and then loosen your rope slightly, pop it round the peg and then tighten it. If your ropes are about the right length, the slider should be a quarter to halfway up from the ground (the ropes on my one-man tent are ludicrously long; I added them myself for Icelandic winds and they were clearly designed for a much larger tent).
Go round each rope that’s in line with a pole first, then do the same thing with any others. You may have one right in the middle of the back of a tunnel tent or ropes sprouting from the middle of each side of a dome tent.
If you have ropes on the porch, don’t follow the line of the poles. The porch needs to be pulled forward. Depending on the exact shape of the porch, it might be better to pull them directly forward or at bit of an angle, especially if your door is right on the front. Mine is on the side but the Guide tents have front doors and so you position the ropes to give you a bit more leeway getting in and out.
Step six: peg out everything else
Now your tent is up and stable, you can peg out everything else. All those extra pegs along the sides and along the back, the ones holding your doorframes in place etc. Exactly the same as your other pegs, make sure they’re at the right angle so the loops don’t slip off and they’re deep enough in and so on.

Step seven: get the inner/outer up
If, like me, yours pitches outer first, upzip a big door and crawl inside. Your inner should attach to the outer using some kind of hook. Figure out which way round the inner should go (doors match to doors, obviously) and deal with the bottom back corners first. Try not to get your dirty feet on your precious inner. Work from the back to the front and make sure you get in all the corners.

If yours pitches inner first, you now throw the outer over it and attach. I don’t know exactly how and where it attaches but I assume there’s something at each corner and there might be something inside to attach your inner to the poles. It might also be at this stage you have to do all your guys. I’m inexperienced at inner-first pitching but it seems logical for the guy ropes to be on the outer.
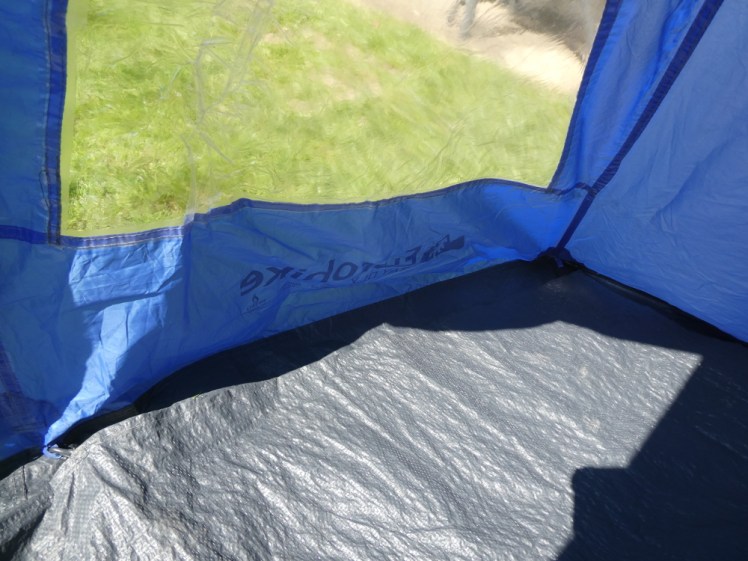
I find this bit gets ridiculously hot and some of the loops have to stretch a lot. Don’t worry too much if one of them breaks – the others will hold your inner up but keep it in mind for repairing later. If you have a bit of groundsheet that clips into your porch, don’t forget that. If you don’t, I highly recommend getting one, even if it’s just one you put in there that isn’t secured in place. Life’s so much easier and cleaner in a tent if you’ve got something to stand on between taking off your shoes and going into the tent.
Step eight: make yourself at home
Get your bed set up! All my tents have a built-in groundsheet but I have little to no faith in them. I started camping in canvas ridge tents where everything had to bring their own groundsheet to sleep on and as we still use them to keep our bedding rolls dry, I’ve never got out of the habit of bringing a groundsheet as an extra layer of protection. Set out your bed, be it a roll of foam, a self-inflating mat, an actual airbed or even a full folding camp bed. Get your sleeping bag laid out and your blanket and put your pyjamas inside so they’re easy to find when you crawl back in the dark. On that note, put your torch somewhere you can easily find it too – that’s the bit I always forget.

Make sure you zip up the outer whenever you go in and out and try not to bring in too much water and mud. Your inner might have a double door – a proper fabric one and an anti-insect mesh one. If it’s too hot in your tent, fold back the fabric door and leave the mesh one zipped up for airflow and to keep the mosquitoes out. Mine has a mesh panel at the top.
Step nine: striking camp
When you get to the end of your trip, or your night in the garden, you’ll need to take the tent down again. By and large, do what you did to put it up in reverse but with a few caveats.
- Make sure the tent is properly dry before you pack it up, including the bottom where it’s touched the ground. Wet tents become mildewy tents and those can become extremely unpleasant when you go to put them up next time.
- Sweep out the inner – how many times have we opened up tents on Guide camp to find dried grass and last year’s sweet wrappers still inside?
- Clean your pegs – mud becomes rust becomes pegs that don’t hold the tent down very well.
- Tie up your guy ropes, otherwise they get into a horrendous tangly mess. I pull the slider right up to the top and then fold the ropes in half a few times until they’re as short as I can tie a simple knot in, and then I tie a simple knot.
- Spread the outer out and lay the inner on top of it. Fold it in quarters lengthways or thirds or whatever makes it approximately the width of the tent bag, then place the pegs and poles in their bag at one end and roll the whole lot up as tightly as you can. I promise it will never fit in the bag on your first attempt so have fun trying to make it as small as possible!
Enjoy your camping!

One thought on “Camping for Beginners: How to pitch a tent”