Yes, it’s the first post of December and it’s a Christmas-themed one from the bear who hates Christmas! I did a fused glass workshop!
I booked it right at the end of October. It was supposed to be on Friday November 6th – yes, the second day of the UK lockdown. On the Saturday night before that, when Boris kept us waiting for three hours before announcing said lockdown, I sighed, acknowledged that I’ve been meaning to do the workshop for years and this was clearly not meant to be the year for it and then went to my laptop to sort out my glamping trip. Hey presto, at 10.30pm there was an email from Linda, who runs the workshop, asking if we wanted to squeeze it in before lockdown or reschedule it for later in December. So on Monday 2nd November, 36 hours after that email, there I was in Salisbury ready to go.
There were four of us. Penny and Hannah were there for a half-day in the morning and Frances and I were there for the day. We started off, as always, with the safety – wear goggles and don’t sweep your board with your bare hands unless you want to embed chips and shards of glass into your skin were the main ones. Don’t eat at your glass-cutting table unless it’s been well and truly swept. Then we had our first try at cutting glass.
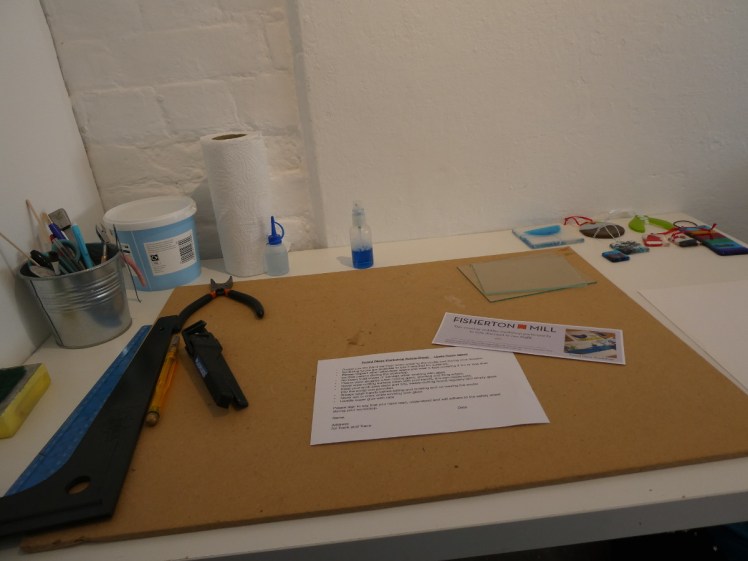
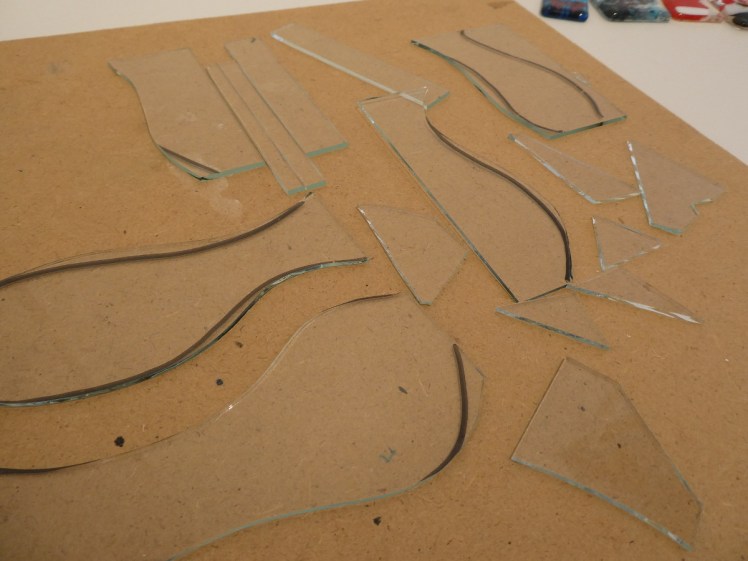
You need two tools – a cutter, which is actually more of a scorer, and a thing to break it with. Straight lines were easy – pull your cutter down your ruler so it makes a scoring noise, which isn’t quite the soul-curling squeal that I suddenly realised I was dreading, then get your tile cutter, align it with your scored line and squeeze gently. Curvy lines had a few difficulties. They need to be so gentle. Glass doesn’t like being cut at any kind of angle so the best you can manage is a wave. Then I guess you could use one of those wavy ruler-things I used in GCSE Graphics but we were doing it freehand, following a line we’d drawn in felt-tip pen, and I found my cutter tended to wander off on its own route. You can’t break along wavy lines in the same way you can a straight line so we had groziers, pliers with a straight top and a curved bottom, and you kind of pull away but down, diagonally. Obviously, this is terrifying at first, especially when we moved away from the thin float glass and onto the 3mm fusing glass, which resisted breaking a little more.
With that done, we did our first project – a small squarish Christmas tree decoration using copper foil (stamp shapes with paper stampers), copper foil (turns into baby-blue bubbles in the kiln) and frit (kind of tiny glass beads that turns into powder in the kiln). This was meant to teach us the basics of putting a piece together and layering but what I learnt was that you put a piece of base glass on top as well as underneath and then we proceeded to do no such thing for the entire rest of the day.

Project Two was the big one. We were going to make something a bit larger, and if we’d had something in mind to make today, this was when to do it. I’d spied a polar bear or two around the studio and I asked if there was a template small enough to put one on a coaster. Yeah, it was a Christmas workshop but it didn’t have to be and I liked the idea of the polar bear blog having a hand-made polar bear coaster.
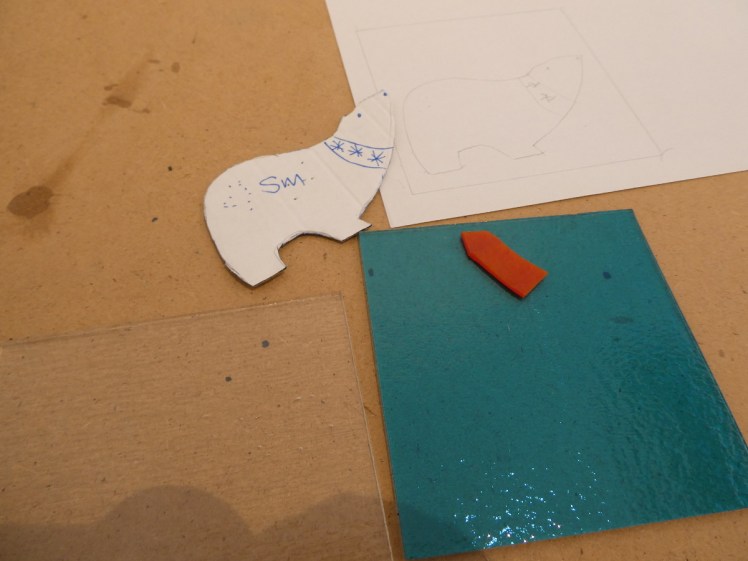
A polar bear is not the sort of shape that glass appreciates being cut into. Linda brought me a clear glass base and a translucent blue piece for a background and then a paper polar bear template and a piece of white opaque glass to cut it out of. I drew round the template and then massacred a piece of red opaque glass into a scarf that would fit around my bear’s neck. This was my first real curved cut and it was small and done on a pretty small piece of glass. The ends had to be straight lines when the bear’s neck is more of a wave because that was just too small but it fitted surprisingly nicely when it was all done.
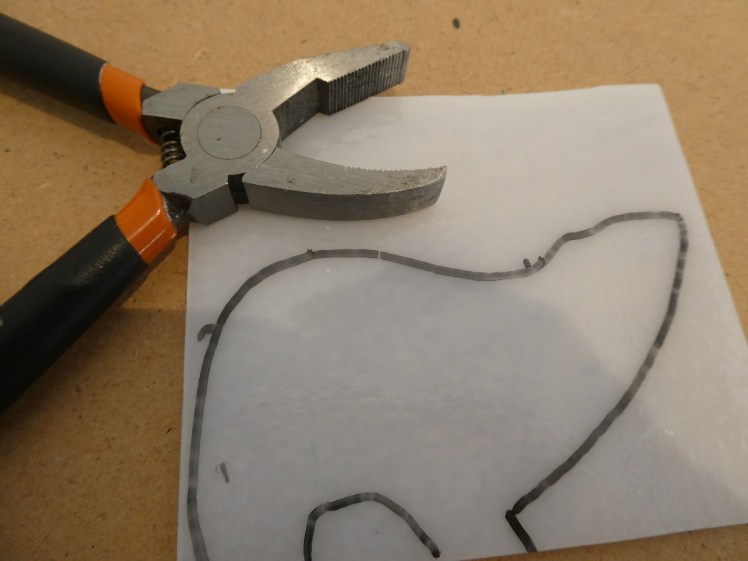
So, from the bear’s nose to its tail was a single wave all the way across a four-inch piece of opaque white glass. I pulled my cutter along my pen line and it scratched satisfyingly and I broke it off with the groziers. Then another wave from tail to back paw. Good good. Then nose down to front paw. There was supposed to be an indent between chest and top of leg but glass doesn’t like that and it had to become a gentle curve. A little too gentle, actually. It was already a pretty stylised polar bear but it’s going to be very stylised when it’s cooked with virtually no distinction between leg and body.

And now the hardest bit – the arch between its back and front legs. I had to do a tiny gentle curve from paw to paw. Then another, slightly to the front and another slightly to the back. And finally, just crunch it gently with the groziers, literally chew the glass into a small arch, scattering tiny chips of broken glass over my desk. And hey presto, I had a polar bear! I gave it a good wash to remove all the pen and checked that the scarf fitted the glass version as well as it had fitted the paper version, which it did.

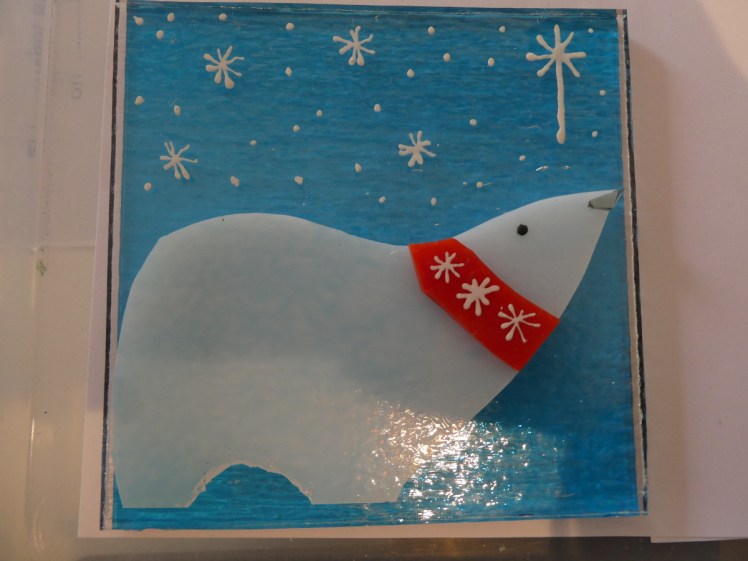
So now I had all my pieces, Linda gave me a pot of white paint with a very fine nozzle on it and I drew some stars on the scarf and then some stars in the blue sky above the polar bear’s head. Turns out they have to go on the clear layer so I washed them off the blue piece and did them again on the clear piece. I drew a tiny black eye on my bear and Linda gave me a miniature chip of grey glass for a nose. It took some fiddling to get that in the right place the right way up, even with the fine-tipped tweezers. I pinged it across the desk, managed to lose it underneath my board and then dropped it yet again before it was finally stuck into place.

And then all my components had to be assembled. I had some glue and I stuck everything down, layer by layer, until all I had left was the blue square. I was still convinced that something goes over the top, like in project one, but no. This time, the blue square was going to go on the back, giving my bear a nice blue night sky background but leaving him nice and stark and white on the front. He’s going to have a full fuse in the kiln to make him as flat as possible but I agreed that I understood that many layers might come out too bumpy to use as a coaster. If he really is, then I’ll mount him in a small frame but I think actually, I’ll just use my enamel camping mugs, which don’t at all mind sitting on an uneven surface.
Frances had started work on two matching angels for her daughters. She had her own template and everything and she spent the entire rest of the day working on them. They were beautiful – blue glass with wavy ends to the wings, copper hearts for faces and hanging wire for halos, with lots of discussion as to the best way of decorating them and whether to have the blue or the clear glass on top. They eventually went for blue on top but I’d be interested to see how it would have looked different depending on which layer went where.
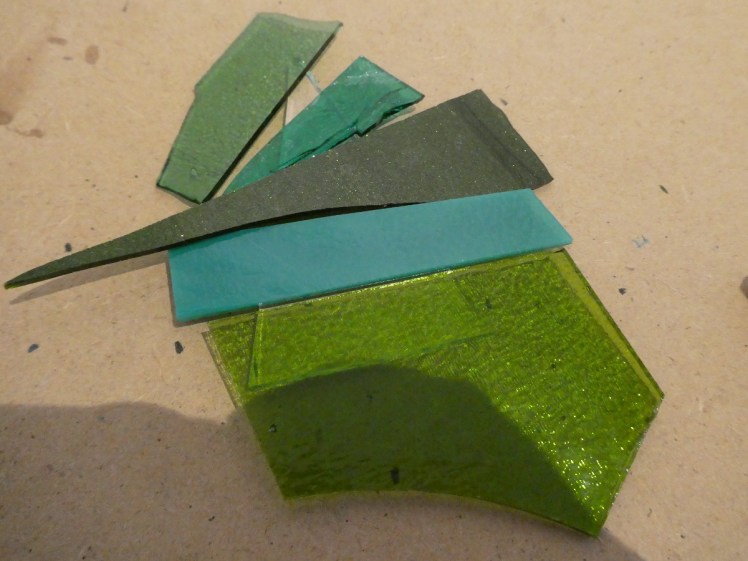
I spent the afternoon on actual Christmas decorations. I made a tree – a simple triangle of clear glass topped with stripes in various shades of green. It seems simple but it took several attempts to measure, mark and cut the stripes, which all had different angles as they went up the tree, and allowing for the fact that the cutter is 2mm away from the ruler you’re running it down. It was supposed to have decorations but they work better on the clear side and the glue is too runny to let me turn it over. On the one hand, that means you can keep moving stuff around for hours, but on the other hand, if you turn it upside down, everything falls off. I’d also made it harder by making a wire star for the top, which was having some difficulty in being held down by the smallest green layer. It’ll be fine once it’s been fired; it’ll all sink in together but getting it to sit nicely on a tray was hard enough, let alone turning it upside down.

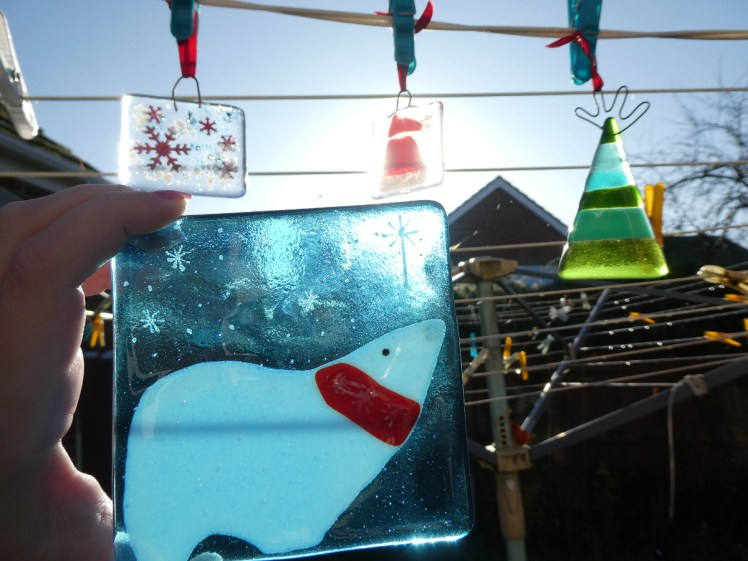
And finally, I made two small square decorations with Christmas hats. Linda more or less makes a new design of this style every year and we have a few of them, but I hadn’t seen the hat. An opaque red triangle with the top cut off and turned sideways to make a point hanging down, a strip of opaque white for the fur around the bottom and a bit of white frit to make a bobble and to make the brim furry.


And then, on the Wednesday, I got the fired and finished pieces back:

They’re so beautiful! All the edges are rounded and they’re thick and smooth and they feel amazing!

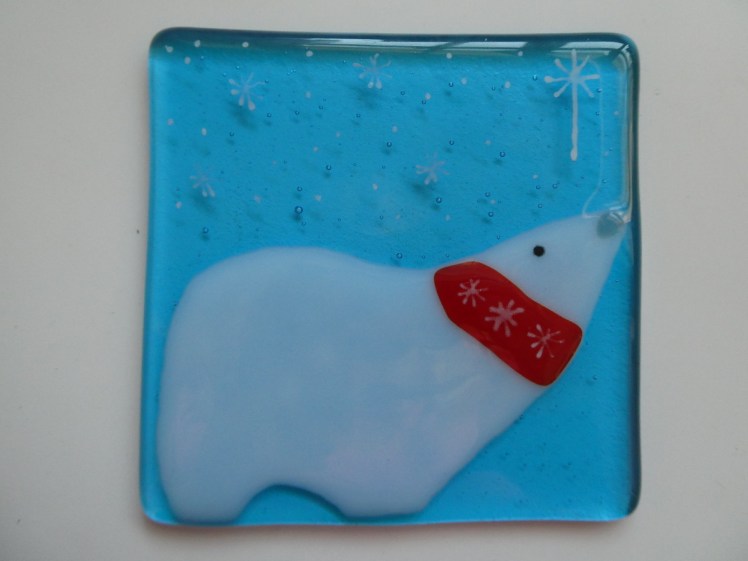
The polar bear coaster is indeed a bit bumpy but it’s 100% smooth enough to put a mug on. I might not put a tall glass but a mug, especially a low wide enamel one is fine. It’s such a beautiful blue and it’s picked up a few bubbles in the kiln, which look like extra stars. The big Christmas star in the sky is clearly visible although the others are a little less obvious and the blue is such a lovely turquoise on my white desk. It’s less pretty on a wooden table after the sun has set, it needs a white or light background to really bring out its colours. The chewed leg-arch is perfectly smooth and the angle of the leg to chest is, as predicted, pretty smooth and straight with next to no distinction. It’s possibly the best thing I’ve ever made.
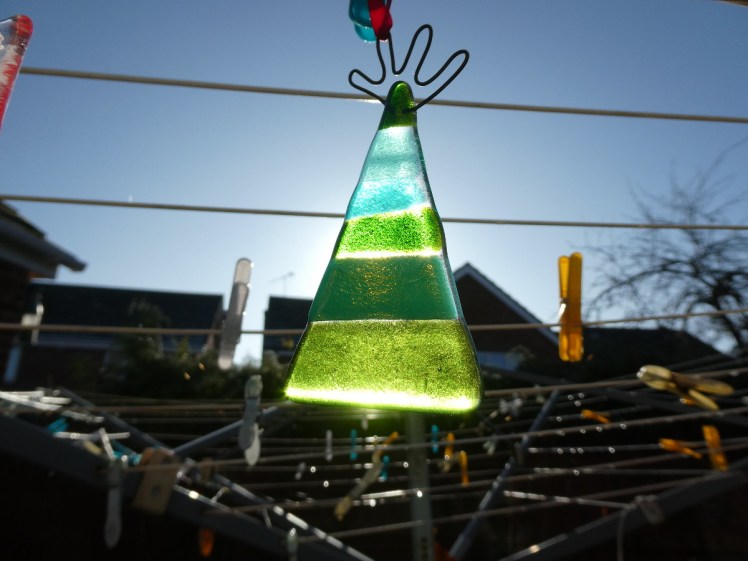

My tree is gorgeous too. I hoped one of the greens would come out sparkly and it did. The one with the split edge near the top has shrunk away very slightly but I suspected something like that might happen and it’s an amazing shade of tree-green. And even my point at the top has managed to fuse into the right place. It’s bumpy because it’s six stripes laid side by side but the hanging ones are allowed to be more textured.
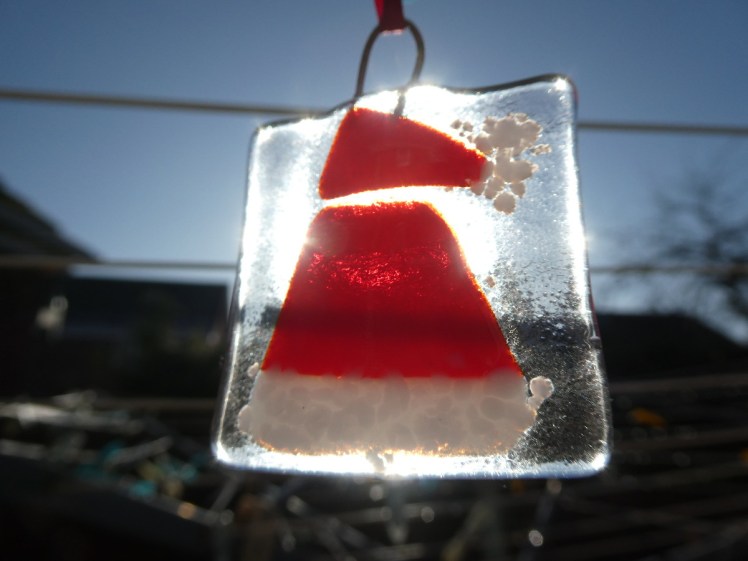

My Santa hats are even more textured, although I think that might be mostly the small square of glass I put on the back to sandwich the copper wire hook. I got overexcited with the frit on one of them and I didn’t get the hat and the point quite aligned on the other but they look good, if a bit daft. I’m pleased with them.


And finally, project one, my first attempt to figure out fusing. I trusted Linda when she said that the copper leaf would turn to blue bubbles but it all looked a bit over-the-top and a bit chaotic when I last saw it because it was just full of copper. But now it’s fired, the copper foil has turned to a volcanic reddish-black and the leaf has indeed turned to baby-blue bubbles. I put some frit on the top but I kind of feel like maybe it should have gone inside. Still, it’s a nice wintery piece that isn’t all red and green and I’m more pleased with it than I expected.
So that was my fused glass workshop and I’ll absolutely be going back again.