You’re a Brownie or Guide or Ranger – or more likely, you’re the parent/guardian/keeper of a Brownie, Guide or Ranger – and you’re sitting there with a camp kit list in your hand right now. “Plate bag?” you say. “What is a plate bag? What do I need in a plate bag?” Well, here I have a series of posts on the mysterious things you might find on your Guide camp kit list.
The plate bag! There are assorted names for this thing – cutlery bag, ditty bag, pot bag, dishes bag, etc. Whatever your local unit calls it, if the name implies kitchenware, this is what it means.
The bag:

It’s just a drawstring bag big enough to put crockery in – not a plastic supermarket bag please! Guides tend to use the plasticky drawstring bag that came as their welcome pack when they started, which is ok if you don’t mind never knowing which one is yours. PE bags are fine. The plasticky ones don’t drain very well, though, and chances are your stuff will be put in damp at some point. By the time you’ve dried six people’s plates and your share of the cookware, the tea towels will be soaked and then drying will be impossible.
Lots of people have homemade plate bags and indeed, some units do this as a craft in a meeting shortly before camp. Tea towels are popular because they’re absorbent. My first bag was made from a pair of old curtains and when it fell to pieces, I made a new one from some slightly stretchy fabric left over from my sister’s ballet costume. It’s hand-sewn but that’s only because I can’t make a sewing machine work. Feel free to use a sewing machine. I’m not delighted by the bright pink fabric, it’s not very me, but it’s what I had at the time and it does the job. The string also has a leather tag on it which I made on my very first Guide camp in 1998. It just seemed a good place to put a camp souvenir. Other good options are cut-down pillow cases. Basically, any fabric you can get your hands on. You can decorate your bag however you like – it needs to be easy to spot among thirty others. Both my leaders when I was a Guide had a little cross-stitch of their name sewn on the front. No Guide I’ve seen since 2007 has bothered and neither have I. Size-wise, approximately A4 (30 x 21cm) is about right but obviously you don’t need to get out the tape measure, just eyeball it so it’s big enough for your biggest plate.

A quick guide to making them: Make a rectangle of your chosen fabric, about A3 size, and lay it out landscape. Fold in the top about half an inch down and sew all the way along. This is your channel for your string. When that’s done, fold the bag in half so the good sides are together and the inside is outside. Sew down the side and along the bottom – make sure that the bag opens along one of its narrow sides. We have had plate bags that open along the wide side but they just don’t work as well. Turn it right side out and thread your string through the channel (stick a safety pin through the end to help you pull it through) and tie both ends together. For string, some sort of cord will do nicely – your local camping shop will sell paracord or spare guyline for a couple of pounds. When you cut it to the right length, wave a flame over it to melt the ends to seal it, otherwise it’ll fray. Use the rest to tie up your bedding roll.
I’ve heard of “ditty bags” being made out of mesh. Mesh is fine too, it dries nicely and the only reason I don’t mention it here is because my sewing skills are nowhere near good enough to hand-make my own mesh bag. If yours are, great. If you buy one, great. My one hesitation would be that if you chuck it down on the ground, the stuff inside is more likely to touch the ground than in a closed-fabric bag like mine and I prefer to not have my plates haphazardly lying on the ground.
For storage, we’ve always made a tripod from three broom handles which we put up in the entrance to the mess tent and then everyone hangs their bag from it. Your unit might leave them in the tents or have a box or table somewhere. At mealtimes, we put out the circle of camp chairs and then the waitress patrol fetches all the bags and either puts them on the chairs or on the floor at their feet so everyone’s ready to take their place.
What goes inside a plate bag:

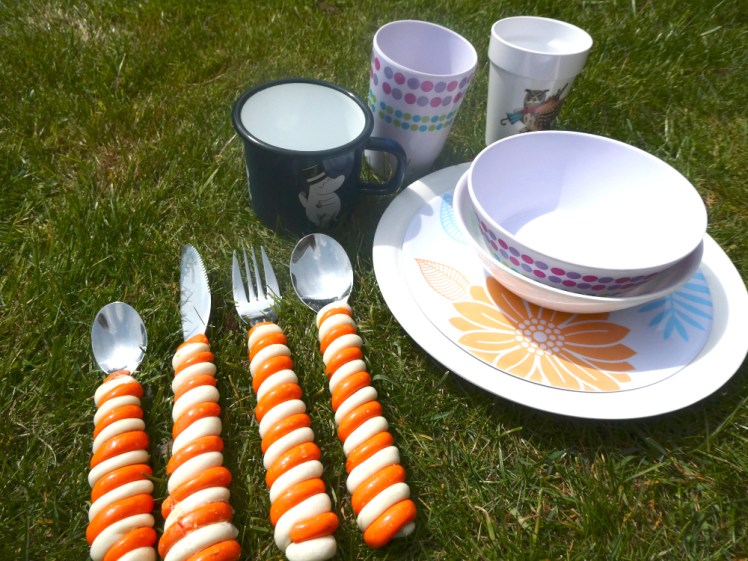
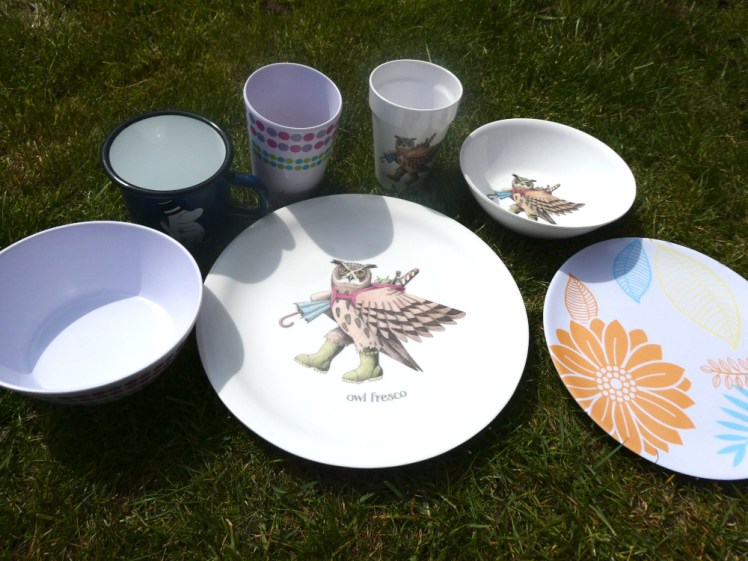
Inside, you will need a plate, bowl, cup, knife, fork and spoon. The crockery must be unsmashable – melamine or good solid plastic is good (although I’ve lost count of the number of plates I’ve trodden on and broken – better than china though! Please don’t take china to camp! Also, please don’t take paper plates!). Enamel is ok – if you’re wearing shorts, though, an enamel plate of hot food will be uncomfortable to put on your lap, although that’s not an issue if you eat at an actual table or on the floor from a groundsheet. We generally eat in a circle of camp chairs so everything goes on your lap.
Enamel mugs are ok because you don’t generally put them on your lap. Again, they do get hot but the handles stay cooler for longer than the body of the mug. Just a word of warning: almost everyone opts for the same blue-with-silver-edging that you get in camping shops so try to find something different. Last but not least, cups with handles are generally best. I know mine don’t have them in the above picture but I usually chuck an enamel mug in there for hot drinks and if I do have a hot drink in my plastic cup, it doesn’t get too hot so pick whatever works best for you.
You only need one of each but I find it’s handy to have two of some things, so you can have dinner on one plate and cake afterwards on the other without having to wash up in between and so on or one cup for cold drinks and one for hot. As a leader, I take spares because I know how often I break plates and I also know that there’s always one girl who forgets/can’t find hers and turns up without anything to eat from, so I always have spares just in case.
Nothing needs to match! As long as the owner knows what’s hers, they can look like absolutely anything. I have one matching bowl, plate and cup, another matching bowl and cup in a different pattern, a plate that doesn’t match anything at all and an enamel mug that also doesn’t match anything.

Metal cutlery is fine, plastic tends to snap. Borrow one of each from the cutlery drawer (but beware that it might not come back/might not come back in the same condition). Otherwise, you can pick up individual items of cutlery in all sorts of shops. Camping shops make special sets that clip together, often with cutouts to make them lightweight. For Guide camp, that sort of weight-saving isn’t going to make a blind bit of difference. You just need a knife, fork and spoon – maybe teaspoon and tablespoon, if you want – and they just need to not be breakable. Many a Guide I’ve seen struggling with a plastic fork that’s down to one prong.
If you really want to make your cutlery stand out, you can do like me and wrap yours in Fimo. Yes, it’s funky. Want a closer look?

It doesn’t really serve any purpose other than being fun and making it easy to spot. To be honest, bits of it crack off from time to time and need to be stuck back with superglue, it needs to be revarnished regularly to stop it feeling sticky and it weighs about five times as much as it would plain. The white bits are glow-in-the-dark which is great but again, doesn’t actually serve much purpose. But it looks great and it always gets attention on camp!
(To make camp cutlery: as many colours of Fimo – polymer clay – as you like. Roll out to long thin sausages (ideally much thinner than mine – mine are far too fat really), wrap around handles, bake in oven as per instructions on packet. Coat with multiple layers of varnish to make it tough and shiny and waterproof. It comes in any colour you like, plus effects – glow-in-the-dark, glitter, stone effect, metallic etc)
Identifying
We wash up in tent groups, aka camp patrols, often on our homemade draining boards. Your stuff needs to be identifiable, so if there’s a chance that someone else has the same plates as you, put your name on it. Marking them with a particular colour nail varnish is a good way, especially on cutlery, which has limited writing space. If you’ve got room – ie on your crockery – you can paint your initials or preferably your name. Sharpies tend to hold up for one camp, if you don’t mind relabelling every year. I’ve never really found an ideal way of marking my stuff, so let me know if you’ve got the secret. However, one metal knife looks very much like another and chances are you’ll come home with someone else’s and you’ll probably never even know it. Obviously if you’ve done Fimo cutlery, there’s a good chance it’ll be unique.
Speaking of washing, Guides are appalling at washing-up and I highly recommend a good wash by a competent adult or a dishwasher when the stuff comes home, especially if it’s going to be shoved in the cupboard in its bag until next year. You do not want to find year-old mould when you’re packing for the next camp!
Optional extras
Some units also ask you to keep a tea towel in your plate bag (my unit provides them, so no need but it’ll vary by unit) and a previous Ranger who was allergic to latex kept her own non-allergenic rubber washing-up gloves in there – we always took latex-free ones because of her but she preferred to be sure about it, which is fine and perfectly reasonable.
I sometimes put other kitcheny bits in there – I take my plate bag when I’m camping on my own and last year I finally made myself a second drawstring bag to store my kitcheny stuff but before that, I’d add in my tiny gas stove and a kitchen knife and things like that, just to keep all the eating stuff together, and I’ll sometimes add in that sort of thing for camp so I can cater for myself. If I’ve got something sharp in there, I’ll often leave the bag in my tent instead of putting it on the tripod with the girls’ bags. It goes without saying that Brownies/Guides/Rangers shouldn’t have sharp knives with them at all but I think a plate bag isn’t a bad idea for family camping or adult camping and this little paragraph is just a little permission to pop in anything else that might be useful for you personally.
Any questions?
Give me a comment if you’ve got any questions I haven’t covered and I’ll try to answer them. Enjoy your camp and bon appetit!
8 thoughts on “The Guide Camp Kit List part one: the plate bag”